Wiss HVAC Hand Seamer
Product Features
Used to bend and flatten sheet metal
Optimal handle span for maximum power and comfortable operating range
3-1/4-Inch jaw width and 1-1/4-Inch maximum seam depth |
Klein Tools 25-Feet by 1-Inch Stand-Out Power-Return Tape Measure
Product Description
The Klein 917-25 Stand-Out Power-Return Tape Measure is 25-Feet long and 1.06-Inch wide. Features include: Nylon-coated hardened steel blade resists abrasion and wear for long life. Built-in shock absorber to protect blade tip. True zero feature for accurate inside and outside measuring. Durable steel belt clip for convenience. Multi-riveted end hook with bottom blade protector reinforces the blade tip and provides maximum pull-out strength. Durable, coated blade is 1.06 wide and 10 times stronger than standard coating. 9' standout (2.7 m). Vertically printed scale on back side of blade. Length: 25-Feet. Width: 1.06-Inch. Weight: 1.2-Pound. Safety information: Always wear approved eye protection. NOT insulated. Do NOT use on live circuits. Do NOT open the case. Spring motor is under tension, and opening case may cause injury. Protect hands when cleaning magnetic tip-use gloves or cloth. Avoid magnetic contact with sensitive electronic or computer equipment. To avoid personal injury and damage to this tool, do not allow the tape blade to retract into case at full speed.
Customer Review
I have only used this tape measure a few times but it is amazing. I compared the Fatmax and many other brands. If you want a tape that is well made with useful features; this is your product. I like the white vertical numbers and the horizontal yellow numbers. It makes it easy to read the tape depending on what you're measuring. It feels very strong performs well! Although I've only used it for a few weeks, I would buy again any day.
|
Malco M2006 MAX2000 Bulldog 1-1/4-Inch Cut Capacity 10-3/4-Inch Left Cut Offset Aviation Snip
Product Description
IMPROVED MAX2000 SNIPS FIT ANY HAND WITHOUT SACRIFICING CUT. Malco Max2000 Aviation Snips now feature all-new, molded thermoplastic grips. These easy-to-spot, solid color coded grips are permanently fitted over full length steel handle shafts and offer strength, comfort and sure handling. A narrower grip opening accommodates large or small hands to maximize the powerful leverage of compound handle-to-head linkage. A new ambidextrous, one-hand-operation latch is another welcome handle change to all Max2000 snips and features an ingenious all-metal design that will not loosen or hang up with repetitive use. Original Max2000 blade designs remain unchanged and retain the same generous cutting lengths. Max2000 hardened alloy steel blades with precision ground cutting edges ensure a minimal force cut and maximum service life. Sleek head and handle styling offer superior material flow and maximum maneuverability.
Customer Review
These snips are excellent for all kinds of sheet metal. Since we do air duct cleaning, we need good snips that last a long time. I have had my pair personally since 2004 and they are still as sharp as the day I got them. We have tried all other brands such as Wiss and Midwest, but none compare to the Malco's! |
Stanley 51-167 22-Ounce FatMax Xtreme AntiVibe Rip Claw Framing Hammer
Product Description
Patented torsion control grip technology reduces the effects of torque on wrists and elbows. Patented AntiVibe technology minimizes vibration and shock at impact. Magnetic nail start feature for extended reach and one-handed nailing capability. Checkered face design increases control and accuracy when driving nails. Precision balanced - feel the difference. Forged, one-piece steel construction for increased strength and durability.
Customer Review
So the last time I really owned a framing hammer was when I graduated high school and was framing houses in AZ. That was over 20 years ago. I bought this to frame some rooms in some living quarters in Afghanistan...and wow have times changed. It has a magnet to hold a nail to tap it in, and then you can just slam it in no problem. I can't really compare it to other framing hammers, but for me...this hammer is great! Good weight, the claw works well, and the nail loader...awesome. I never thought much about hammer technology, but I'm glad Stanley did. Great buy! |
DEWALT Bare-Tool 3/8-Inch 18-Volt Cordless Right Angle Drill/Driver
From the Manufacturer
The DeWalt DW960B 3/8-inch (10 mm) 18-volt cordless right angle drill/driver is a compact drill/driver that provides users with first-rate performance and durability along with exceptional ergonomics. The DW960B has speed settings range from 0-500 to 0-1,500 rpm for increased user flexibility and provides for a wide range of applications. With a 3/8-inch plastic, ratcheting chuck, this drill/driver has a durable, right angle transmission with sealed ball bearing for a longer tool life and 320 unit watts out of maximum power for heavy-duty applications such as turning large bits and fasteners. The multi-grip trigger provides comfort and convenience by allowing the user to get into tighter spaces while still having access to the trigger. Weighing only 2.8 pounds without the battery (not included), the lightweight design minimizes user fatigue. The DeWalt DW960B is covered by a warranty package that includes a 90-day money back guarantee, 1-year free service contract, and a 3-year limited warranty. |
Milwaukee 5380-21 1/2-Inch 9-AMP Heavy Duty Hammer Drill
Customer Review
Awesome product for sure but then again, it is a Milwaukee. This drill has the professional in mind with all its features. It is well balanced and easy to use even for a homeowner. Thank God this has a keyed chuck, keyless chucks are horrible and don't grip well. I am happy with my purchase and the price paided. The drill is as advertised with no surprises. The only CON I have is the unit being an import (American Made Rules). Everything out there is presently an import, so pick your poison but make it Milwaukee. |
Milwaukee 6390-21 7-1/4-Inch 15-Amp Tilt-Lok Circular Saw
Product Description
This saw's bade can bevel to 50 degrees and offers superior visibility and a clear sight line from either side. An eight position cushioned top handle adjusts to any cutting application for the best ergonomic grip, maximizing comfort and control. It has helical steel gears, a 22 amp switch, 120 volts AC/DC, and 5800 rpm. The 5/8-inch spindle and double insulated construction and lightweight 7-1/4-inch right blade saw with Milwaukee's exclusive Tilt-Lok main handle adjusts to the work for most comfortable work position and is the most revolutionary concept for circular saws in years Weighing in at 10.4 pounds and featuring a powerful Milwaukee built 15-amp motor, this saw provides 3.25 maximum horsepower and offers a great power to weight ratio. |
DEWALT DW2235IR 5-Piece Magnetic Impact Ready Nutsetter Set
Customer Review
I have had a lot of these nut driver sets, including some older DeWalt and newer Milwaukee. This set holds and drives the screws and nuts as good or better than the several I've owned and used. So far, the durability is better than most. This is the first set I've gotten with a 1/2" socket, as most off the sleeve sets don't have it. I really like having that 1/2" driver for driving small lag screws. Another nice feature is the socket size labels on them, which show even in dim light. |
DEWALT D180056 3-1/2-Inch Standard Bi-Metal Hole Saw
Customer Review
Very simple this is a hole saw price was good. The measurement was correct and it cut the hole I needed to cut. I was mounting a JVC TV that I purchased from Amazon. I needed a hole to place a power socket and this hole saw did the trick. |
MK Morse AV68 Hole Saw, 4-1/4-Inch Bi-Metal Boxed
From the Manufacturer
Master Cobalt Bi-Metal Hole Saws. This premium line of professional quality hole saws features an M3 high-speed steel cutting edge, electron beam welded to a tough steel backer. Caps stand up to abuse and punishment, yet are lighter and easier to use than those of competitors. Positive rake tooth design provides better chip clearance as teeth cut into wood, plastic or any machinable metal. The 1-1/2-Inch cutting depth cuts easily though 2x4's. A separate arbor is required. |
|
|
Some of the visitors of my website are very sophisticated DIY-rs. They don’t need long and detailed explanations; they just want to see how it supposed to be done so they can do it!
Therefore, I've come up with an idea to make some installation pages without any explanations or with brief explanations to them. The pages have pictures of all necessary materials, tools and actual installation. If you click on the link you will see a part of the page. If you would like to see the page as a whole you should click on the "Buy Now" button below it. Price for installation in pictures is $2.00. If you would like to see the full scale explanation you can click on another "Buy Now" button below it. Price for a detailed explanation is $2.50.
|
|
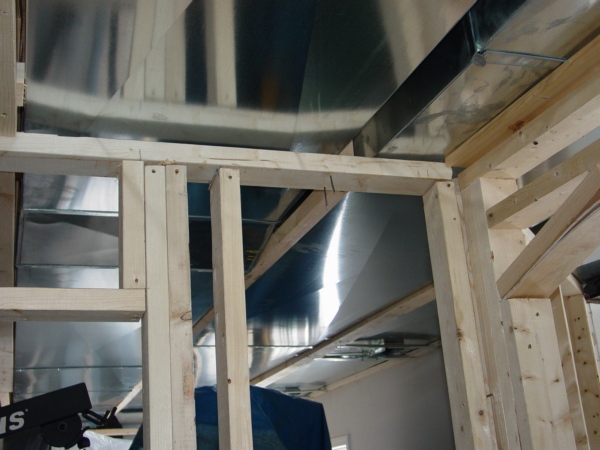
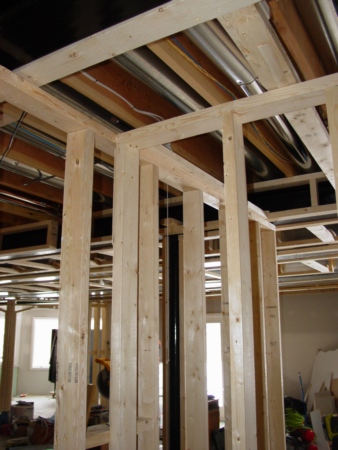
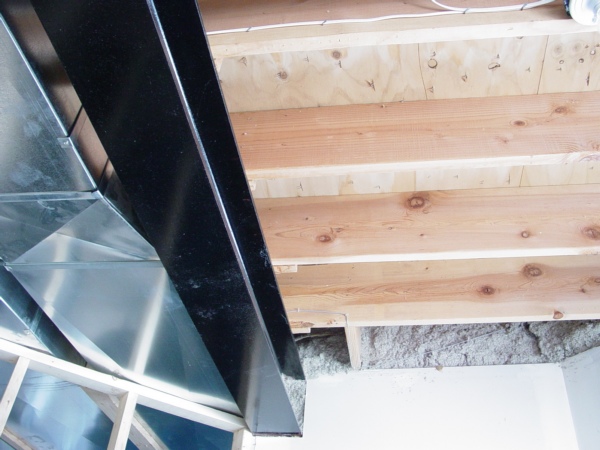
Attic Ductwork Installation
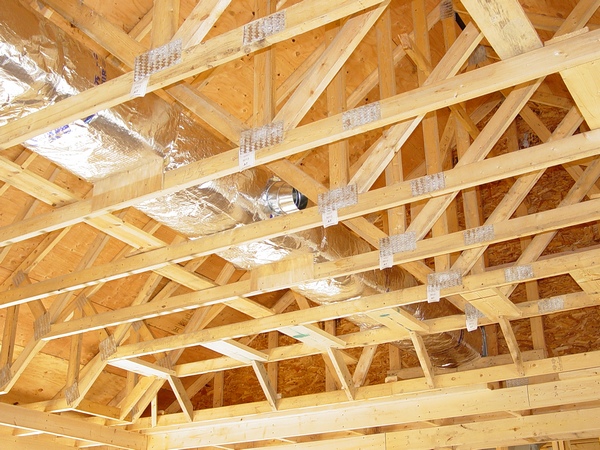 This page is dedicated to the attic ductwork installation, running of the ductwork in a chase, furnace and garage tube heater installation. You can see 71 high quality pictures that represent a project in the making! This page is dedicated to the attic ductwork installation, running of the ductwork in a chase, furnace and garage tube heater installation. You can see 71 high quality pictures that represent a project in the making!
So, if you would like to see all these pictures presented on the page please pay $2.00 (two dollars) and now with brief explanationsthe the page is twice as valuable!
In order to gain an access to this page you will have to pay the access fee of $2.00. Just click on the “Buy Now” button below. Once you pay, you will gain an instant access to the page!
Instant Access
After you have purchased a paid page, Pay Pal will bring you back to my website. In order to see the paid page you have to click on the “Register” button, fill out a form, chose your own Username and Password and click on the “Register” button at the bottom of the form – congratulation, you are now on the page you have paid for!
Important: After you have purchased any Paid page or Download page and PayPal brought you back to my website, the first thing that you should do is to save that page to your Favorites. Then if something goes wrong you always can come back to re-register yourself on my website again.
|
|
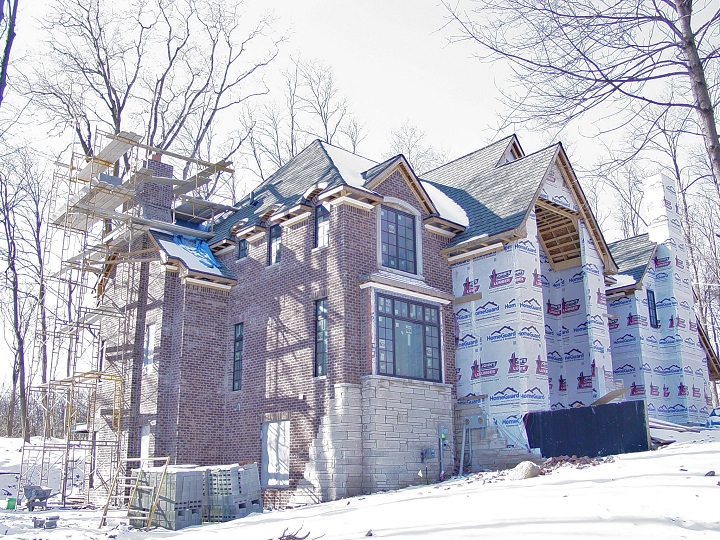
Top of the Line Ranch
 This is a huge house! I live in a colonial, but I can easily fit my entire house all together with the roof in this house's great room! Enjoy 50 pictures and ask your questions or leave a message at the bottom of this page. This is a huge house! I live in a colonial, but I can easily fit my entire house all together with the roof in this house's great room! Enjoy 50 pictures and ask your questions or leave a message at the bottom of this page.
|
|
Top of the Line House Ductwork Installation
If you are planning to build a beautiful and expensive house this page is just for you!


Maybe you are not planning to build a 10,000 square feet house and spend something around $85,000.00 for the HVAC installation in the foreseeable future, but you're definitely may find some interesting ideas which even I wasn't familiar with!
For example:
What would you do if you do not like all these ugly wall registers, and of course a lot more!
Furthermore, if you just bought the "Attic Ductwork Installation" page you may find another way of running ductwork in the attic.
|
|
House with Two Geothermal Units
 This house has two geothermal units, one on the second floor and another one in the basement. Learn some interesting air distribution techniques on the page. If you have any questions ask them on this page. This house has two geothermal units, one on the second floor and another one in the basement. Learn some interesting air distribution techniques on the page. If you have any questions ask them on this page.
|
|
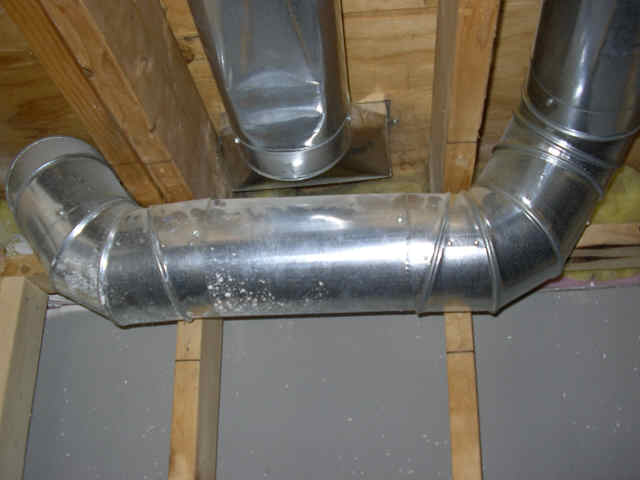
Ductwork Relocation
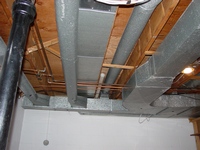 People who want to finish their very low ceiling basements must fight for every single inch of it space! Unfortunately, most of the heating contractors, while they are installing ductwork, do not consider it. People who want to finish their very low ceiling basements must fight for every single inch of it space! Unfortunately, most of the heating contractors, while they are installing ductwork, do not consider it.
On the pages dedicated to this issue, on one page you can look at the 15 pictures without any explanations and see entire project in the making. In addition, you can purchase another page with a full-scale step-by-step explanations to it.
What you can see in the picture above is the installation before I made some changes. Of course your case could be different, so after you read on the page Pay Pal will provide you with my e-mail address and then you can send me some pictures and ask all your questions about installation in your particular case!
Price for the installation in pictures page is only $2.00
Price for the page with explanations is only $2.50
This page is the part of the Finished Basement Edition e-book. Click here and save.
Just click on one of the “BuyNow” buttons below. Once you pay, you will gain an instant access to the page!
Instant Access
After you purchased a paid page, PayPal will bring you back to my website. In order to see the paid page you have to click on the “Register” button, fill out a form, choose your own Password and Username and click on the “Register” button at the bottom of the form – congratulation, you are now on the page you have paid for!
|
Ductwork Relocation in Pictures $2.00
|
| Ductwork Relocation with Explanations $2.50 |
|
Double Cold Air Return Installation
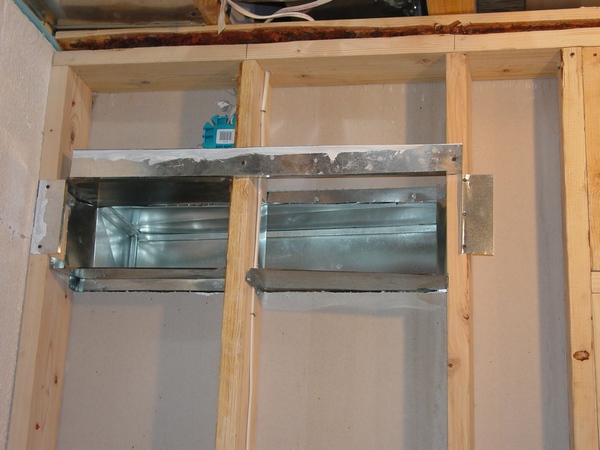 On this page you can see pictures of all materials and tools necessary for installation. Pictures, which represent installation are set in a sequence in which the installation should be executed. There are 40 pictures on the page. On this page you can see pictures of all materials and tools necessary for installation. Pictures, which represent installation are set in a sequence in which the installation should be executed. There are 40 pictures on the page.
Detailed explanations for this topic is also available!
Installation on the paid pages might not exactly describe your upcoming project. However, it will give you an important example of how this type of installation should be done. In addition, it will open the gates for as many questions as necessary to make sure that the job is done right.
In order to gain an access to the Double Cold Air Return Installation in Pictures page you have to pay an access fees of $2.00.
In order to gain an access to the Double Cold Air Installation with Explanations you have to pay an access fee of $2.50.
Just click on one of the “BuyNow” buttons below. Once you pay, you will gain an instant access to the page!
This page is the part of the Finished Basement Edition e-book. Click here and save.
Instant Access
After you purchased a paid page, PayPal will bring you back to my website. In order to see the paid page you have to click on the “Register” button, fill out a form, and click on the “Register” button at the bottom of the form – congratulation, you are now on the page you have paid for!
|
Double Cold Air Return Installation in Pictures $2.00
|
| Double Cold Air Return Installation with Explanations $2.50 |
|
Double Return for Finished Basement Installation in Pictures
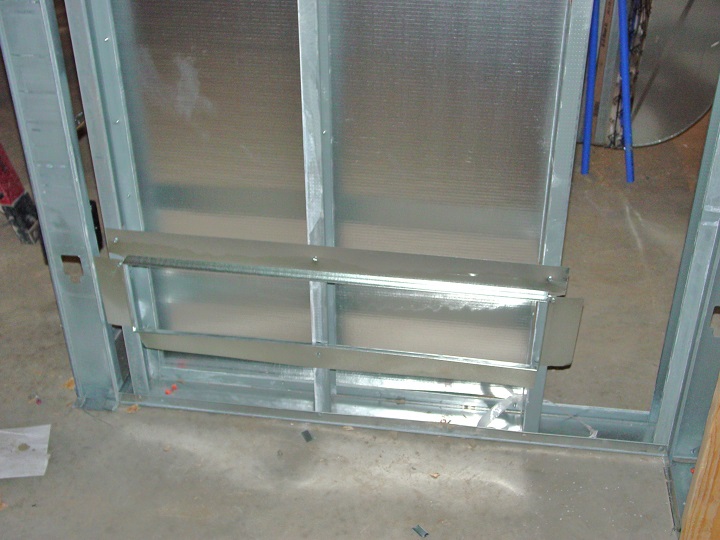
Learn how to install a double cold air return for your finished basement project in the case if you are using metal studs, thermo-pan and flex.
If you would like to see all the pictures presented on the page please pay $2.50 and with brief explanations this page is twice as valuable!
This page is a part of the Finished Basement Edition e-book. Click here and save.
On 04/19/2016 two more variants of the double cold air returns were added.
|
|
Ducted Cold Air Return
 On this page you can see pictures of all materials and tools necessary for installation. On this page you can see pictures of all materials and tools necessary for installation.
The pictures, which represent installation are set in the sequence in which the installation should be executed. There are 20 pictures on the page. Price for the instant access to the page is $2.00.
Detailed explanation for this topic is also available. Price for the page with explanations is $2.50.
Installation on the paid page might not exactly describe your upcoming project. However, it will give you an important example of how this type of installation should be done. In addition, it will open the gates for as many questions as necessary to make sure that the job is done right.
In order to gain accesses to these pages you have to pay access fees: $2.00 or $2.50. Just click on one of the “BuyNow” button below. Once you pay, you will gain an instant access to the page!
This page is the part of the Finished Basement Edition e-book. Click here and save.
Instant Access
After you purchased a paid page, the PayPal will bring you back to my website. In order to see the paid page you have to click on the “Register” button, fill out a form, and click on the “Register” button at the bottom of the form – congratulation, you are now on the page you have paid for!
|
| Ducted Cold Air Return Installation in Pictures $2.00 |
| Ducted Cold Air Return Installation with Explanations $2.50 |
|
Basement Cold Air Return in Pictures
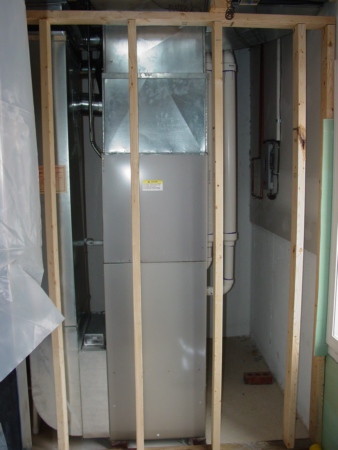 On this page, you can see pictures of all materials and tools necessary for installation. Pictures, which represent installation, are set in a sequence in which the installation was executed. There are 15 pictures of tools and materials and 13 pictures of actual installation. On this page, you can see pictures of all materials and tools necessary for installation. Pictures, which represent installation, are set in a sequence in which the installation was executed. There are 15 pictures of tools and materials and 13 pictures of actual installation.
As you can see in the picture on the left the original builder put a window too close to the furnaces! He probably thought that all this aria - from the furnaces, down to the window's end will be just enough for an entire storage-mechanical room, but a homeowner had a different opinion. However, because of that I didn't have enough room for a cold air return to the left, so I ran it to the right.
In addition I've included some brief explanations, which made this page twice as valuable!
Installation on the paid pages might not exactly describe your upcoming project. However, it will give you an important example of how this type of installation should be done. In addition, it will open the gates for as many questions as necessary to make sure that the job is done right.
In order to gain an access to the Basement Cold Air Return Installation in Pictures page you have to pay an access fee of $1.86. Just click on the “Buy Now” button below. Once you pay, you will gain an instant access to the page!
This page is the part of the Finished Basement Edition e-book. Click here and save.
Instant Access:
After you have purchased a paid page; PayPal is going to bring you back to my website. In order to see the paid page you have to click on the “Register” button, fill out the form, choose your own Username and Password and click on the “Register” button at the bottom of the form – congratulation, you are now on the page you have paid for!
Important: After you have purchased any Paid page or Download page and PayPal brought you back to my website, the first thing that you should do is to save that page to your Favorites. Then if something went wrong you always can come back to re-register yourself on my website again.
|

|
Return from Exterior Wall in Basement (Installation in Pictures)
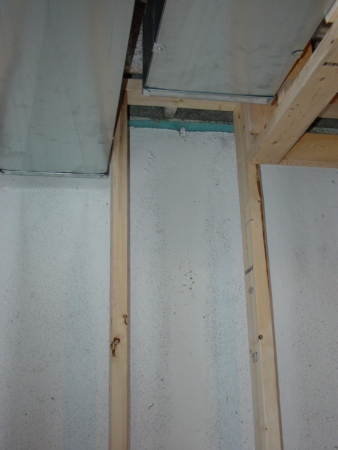 Sometimes you do not have a choice, but must use an exterior wall for a cold air return in your finished basement. This type of installation requires a different approach, which I have employed for this project. Sometimes you do not have a choice, but must use an exterior wall for a cold air return in your finished basement. This type of installation requires a different approach, which I have employed for this project.
On the page, you can see 11 pictures of the tools and materials and 16 pictures of installation that represent it in the step-by-step manner.
In addition I've included some brief explanations, which made this page twice as valuable!
In order to gain an access to the Return from Exterior Wall in Basement (Installation in Pictures) page you have to pay an access fee of $1.86. Just click on the “Buy Now” button below. Once you pay, you will gain an instant access to the page!
This page is the part of the Finished Basement Edition e-book. Click here and save.
Instant Access:
After you have purchased a paid page; PayPal is going to bring you back to my website. In order to see the paid page you have to click on the “Register” button, fill out the form, choose your own Username and Password and click on the “Register” button at the bottom of the form – congratulation, you are now on the page you have paid for!
Important: After you have purchased any Paid page or Download page and PayPal brought you back to my website, the first thing that you should do is to save that page to your Favorites. Then if something goes wrong you always can come back to re-register yourself on my website again.
|
|
Three Cold Air Returns from Interior Wall (Installation in Pictures)
 On this page, you can learn how to connect a cold air return to the wall that sits directly under the cold air duct and to the wall located under the panning. On this page, you can learn how to connect a cold air return to the wall that sits directly under the cold air duct and to the wall located under the panning.
On the page, you can see 17 pictures of the tools and materials and 16 pictures of installation that represent it in the step-by-step manner, in addition I've included some brief explanations, which made this page twice as valuable!
In order to gain an access to the Two Cold Air Returns from Interior Wall (Installation in Pictures) page you have to pay an access fee of $2.50. Just click on the “Buy Now” button below. Once you pay, you will gain an instant access to the page!
On 04/10/2016 one more instance of the cold air return was added. Now it’s become Three Cold Air Returns from Interior Wall and this one is a double return! This new addition includes 9 high quality pictures with brief explanations to them.
This page is the part of the Finished Basement Edition e-book. Click here and save.
|
|
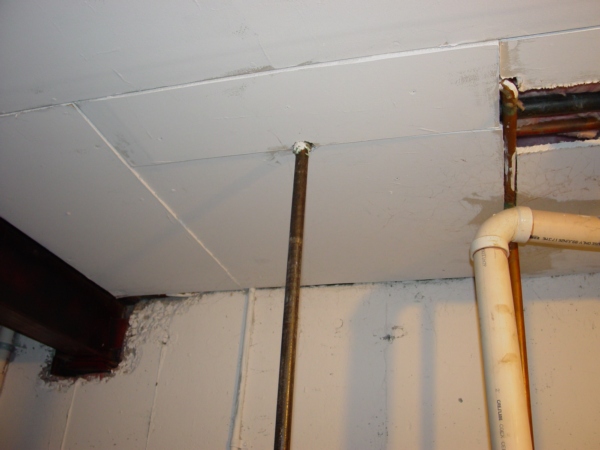
Rerun of Heat Run
 On this page, you can find a description of how to re-run a heat run, which is set in the middle of the basement's ceiling and by exterior wall in a more suitable area for your finished basement project place. Here you can see pictures of all materials and tools necessary for installation. On this page, you can find a description of how to re-run a heat run, which is set in the middle of the basement's ceiling and by exterior wall in a more suitable area for your finished basement project place. Here you can see pictures of all materials and tools necessary for installation.
Pictures and explanations that represent installation are set in the sequence in which the installation should be executed.
If you are doing a finished basement project, most likely, that you are going to deal with this problem on your hands. So, stop inventing a bicycle! If you are finishing your basement off yourself you are already saving a lot. Just give yourself a bit of respect – save some time and some money on the unnecessary mistakes!
Installation on the paid page might not exactly describe your upcoming project. However, it will give you an important example of how this type of installation should be done. In addition, it will open the gates for as many questions as necessary to make sure that the job is done right.
There are 36 (two more pics added (01/07/11) pictures in the "Re-run of Heat Run" in pictures part and 19 pictures in the "Re-run of Heat Run" with explanations page.
This page is the part of the Finished Basement Edition e-book. Click here and save.
|
| Rerun of the Heat Runs in Pictures $2.00 |
| Rerun of the Heat Runs with Explanations $2.50 |
|
Bathroom Heat for Finished Basement (Installation in pictures)
If your bathroom is located somewhere in the middle of your finished basement, you do not need to supply too much air into it. You just need a vent to compensate air losses to the bath fan and not much else.
On this page, you will learn how to tee-off an existing duct, which is working for the adjacent storage room in order to rout some air to the bathroom.
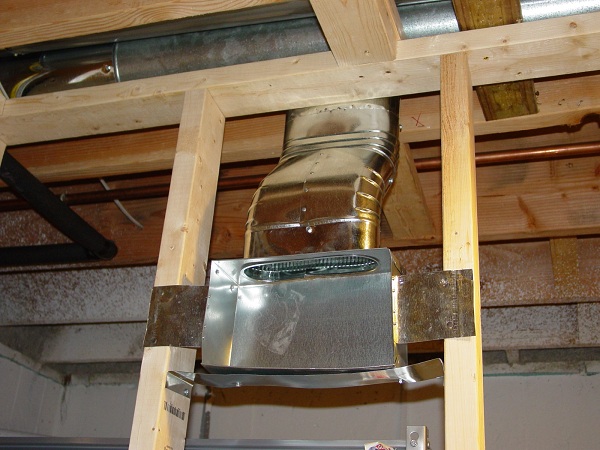 On the page, you can see 12 pictures of the tools and materials and 7 pictures of installation that represent it in the step-by-step manner. On the page, you can see 12 pictures of the tools and materials and 7 pictures of installation that represent it in the step-by-step manner.
In addition I've included some brief explanations, which made this page twice as valuable!
In order to gain an access to the Bathroom Heat for Finished Basement (Installation in Pictures) page you have to pay an access fee of $1.86. Just click on the “Buy Now” button below. Once you pay, you will gain an instant access to the page!
This page is the part of the Finished Basement Edition e-book. Click here and save.
Instant Access:
After you have purchased a paid page; PayPal is going to bring you back to my website. In order to see the paid page you have to click on the “Register” button, fill out the form, choose your own Username and Password and click on the “Register” button at the bottom of the form – congratulation, you are now on the page you have paid for!
Important: After you have purchased any Paid page or Download page and PayPal brought you back to my website, the first thing that you should do is to save that page to your Favorites. Then if something goes wrong you always can come back to re-register yourself on my website again.
|
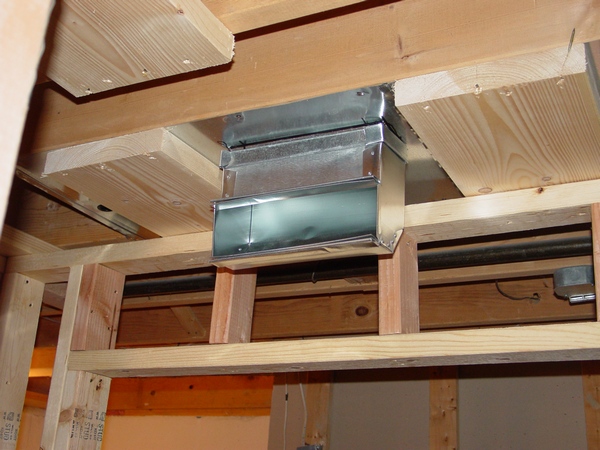
Tapping Two Heats for the Finished Basement (Installation in Pictures)
 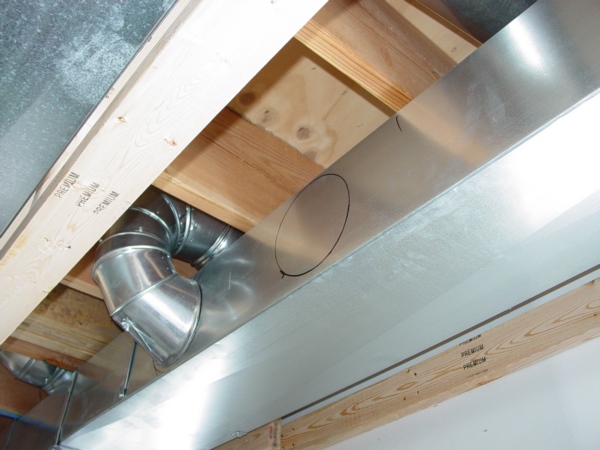 On this page, you can learn how to tap into an existing supply duct to add registers in two rooms for your finished basement project. One of the heats was tapped into the duct's top, another into its side. In addition, one of the heats can be considered as a "straight shot", while another has two "jumpers". On this page, you can learn how to tap into an existing supply duct to add registers in two rooms for your finished basement project. One of the heats was tapped into the duct's top, another into its side. In addition, one of the heats can be considered as a "straight shot", while another has two "jumpers".
On the page, you can see 19 pictures of the tools and materials and 32 pictures of installation that represent it in the step-by-step manner, in addition I've included some brief explanations, which made this page twice as valuable!
In order to gain an access to the Bathroom Tapping Two Heats for Finished Basement (Installation in Pictures) page you have to pay an access fee of $2.37. Just click on the “Buy Now” button below. Once you pay, you will gain an instant access to the page!
This page is the part of the Finished Basement Edition e-book. Click here and save.
Instant Access:
After you have purchased a paid page; PayPal is going to bring you back to my website. In order to see the paid page you have to click on the “Register” button, fill out the form, choose your own Username and Password and click on the “Register” button at the bottom of the form – congratulation, you are now on the page you have paid for!
Important: After you have purchased any Paid page or Download page and PayPal brought you back to my website, the first thing that you should do is to save that page to your Favorites. Then if something goes wrong you always can come back to re-register yourself on my website again.
|
|
Combustion Air Intake Installation in Pictures
 For years, I was preaching about high necessity of the combustion air intake, but did not have one installed in my own house. I have both - high efficiency furnace and a water heater and a water heater that was working just fine, recently I've discovered why! My builder left narrow, but long gap in the overhangs under the bay window and fireplace shaft, and this was my combustion air intake! For years, I was preaching about high necessity of the combustion air intake, but did not have one installed in my own house. I have both - high efficiency furnace and a water heater and a water heater that was working just fine, recently I've discovered why! My builder left narrow, but long gap in the overhangs under the bay window and fireplace shaft, and this was my combustion air intake!
Therefore, I've decided to install one, figured out its size, bought materials, took some pictures and posted them on this page.
Also, in order to make this page more informative I included several pictures from another finished basement project. They're, just like the pictures taken from my home installation show step-by-step sequence of installation, in addition I've included some brief explanations, which made this page twice as valuable!
Pictures from "How to Stop Cold Air from Fresh Air (Combustion Air) Vent in Furnace Room" paid page included.
In order to gain an accesses to the Combustion Air Intake Installation in Pictures page you have to pay an access fee of $2.00. Just click on the “Buy Now” button below. Once you pay, you will gain an instant access to the page!
This page is the part of the Finished Basement Edition e-book. Click here and save.
Instant Access:
After you have purchased a paid page; PayPal is going to bring you back to my website. In order to see the paid page you have to click on the “Register” button, fill out the form, choose your own Username and Password and click on the “Register” button at the bottom of the form – congratulation, you are now on the page you have paid for!
Important: After you have purchased any Paid page or Download page and PayPal brought you back to my website, the first thing that you should do is to save that page to your Favorites. Then if something goes wrong you always can come back to re-register yourself on my website again.
|
|
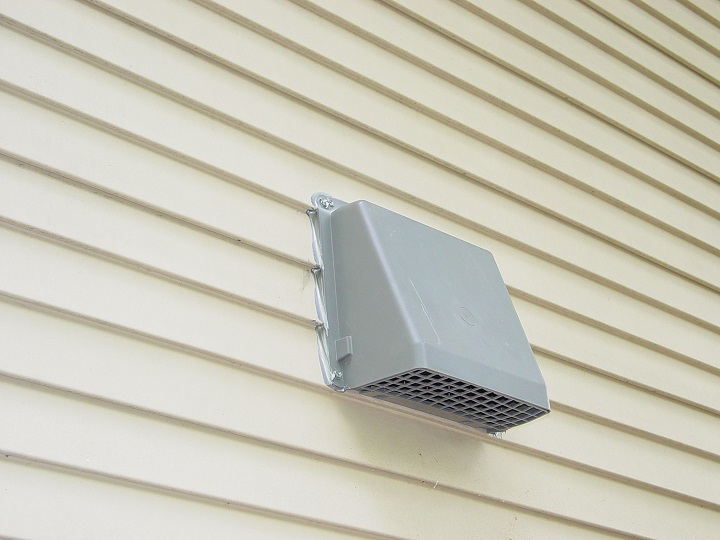
Venting of Two Bathroom Fans (Installation in Pictures)
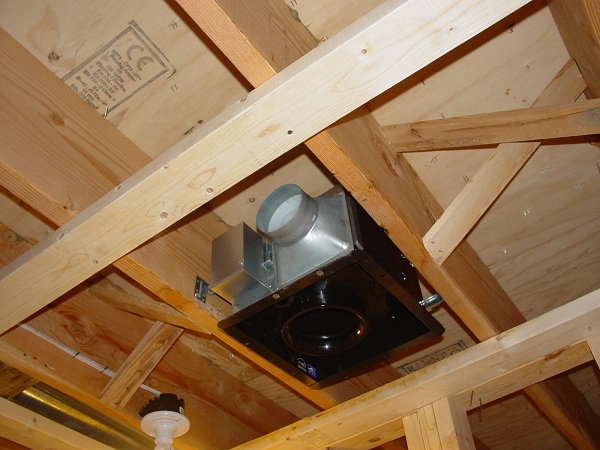 Usually when people finish their basements off they make a bathroom or two, but sometimes in addition to the bathroom, they build a steam room and sauna. In this case, one fan isn't enough and another fan should be mounted in a dress room in front of the steam room. Usually when people finish their basements off they make a bathroom or two, but sometimes in addition to the bathroom, they build a steam room and sauna. In this case, one fan isn't enough and another fan should be mounted in a dress room in front of the steam room.
On this page, you will learn how to exhaust both fans in a single pipe and how to vent it through the brick wall.
On the page, you can see 12 pictures of the tools and materials and 13 pictures of installation that represent it in the step-by-step manner.In addition I've included some brief explanations, which made this page twice as valuable!
In order to gain an access to the Venting of Two Bathroom Fans (Installation in Pictures) page you have to pay an access fee of $1.86. Just click on the “Buy Now” button below. Once you pay, you will gain an instant access to the page!
This page is the part of the Finished Basement Edition e-book. Click here and save.
Instant Access:
After you have purchased a paid page; PayPal is going to bring you back to my website. In order to see the paid page you have to click on the “Register” button, fill out the form, choose your own Username and Password and click on the “Register” button at the bottom of the form – congratulation, you are now on the page you have paid for!
Important: After you have purchased any Paid page or Download page and PayPal brought you back to my website, the first thing that you should do is to save that page to your Favorites. Then if something goes wrong you always can come back to re-register yourself on my website again.
|
|
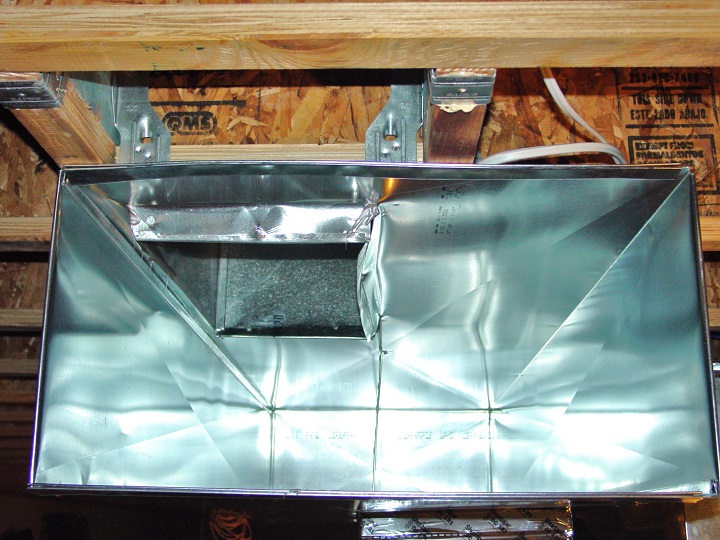
Range Hood in Finished Basement
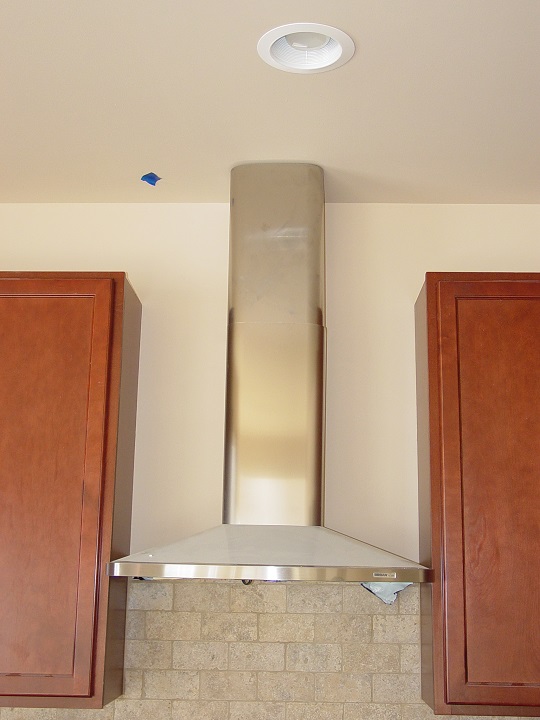 On the rare occasion, people who finish their basements off put an additional kitchen. This kitchen as any other may have a microwave hood or kitchen hood and on this page you can learn how to install it. On the rare occasion, people who finish their basements off put an additional kitchen. This kitchen as any other may have a microwave hood or kitchen hood and on this page you can learn how to install it.
On this page, you can see illustrations of all installation in the making except installation of the kitchen hood itself. However, if you would purchase this page by the time you will be ready to mount one I will make all necessary additional pictures and invite you back to this page.
On the page, you can see 20 pictures of the tools and materials and 9 pictures of installation that represent it in the step-by-step manner.
In order to gain an access to the Finished Basement Kitchen Hood (Installation in Pictures) page you have to pay an access fee of $1.34. Just click on the “Buy Now” button below. Once you pay, you will gain an instant access to the page!
This page is the part of the Finished Basement Edition e-book. Click here and save.
Instant Access:
After you have purchased a paid page; PayPal is going to bring you back to my website. In order to see the paid page you have to click on the “Register” button, fill out the form, choose your own Username and Password and click on the “Register” button at the bottom of the form – congratulation, you are now on the page you have paid for!
Important: After you have purchased any Paid page or Download page and PayPal brought you back to my website, the first thing that you should do is to save that page to your Favorites. Then if something goes wrong you always can come back to re-register yourself on my website again.
|
|
How to Hook up Kitchen Hood in Remodeling Project Installation in Pictures
 On this page you can find a step-by-step guidance that include 9 high quality pictures with brief explanations. On this page you can find a step-by-step guidance that include 9 high quality pictures with brief explanations.
The price of this page is only $1.34.
|
|
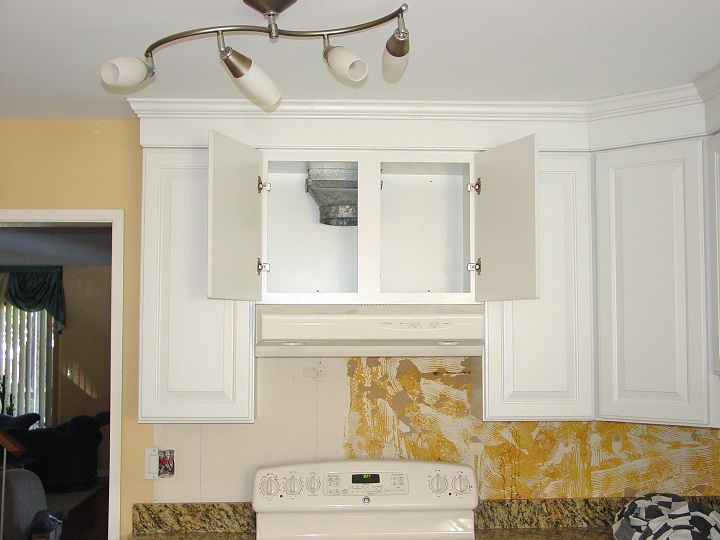
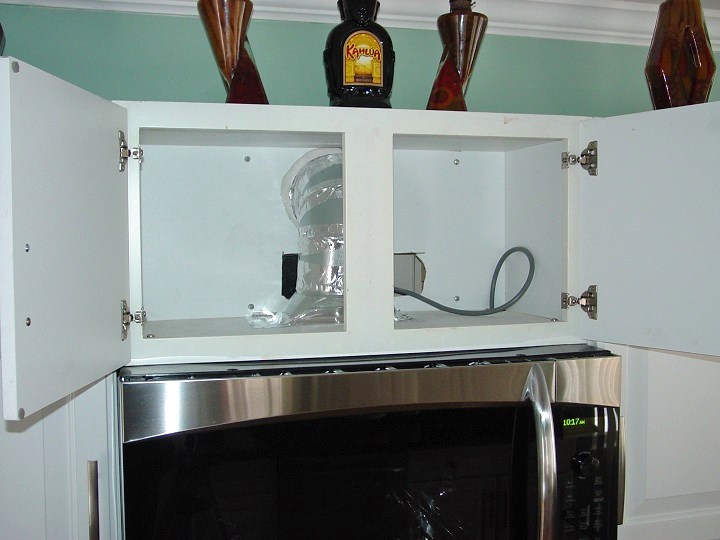
Microwave Hood Vent Installation in Pictures
 A microwave that you can see in the picture on the left top corner was working in the recirculation mode. Unfortunately it didn't serve the purpose and idea to exhaust it to the outside eventually came to fruition! A microwave that you can see in the picture on the left top corner was working in the recirculation mode. Unfortunately it didn't serve the purpose and idea to exhaust it to the outside eventually came to fruition!
The most discouraging part of this project was microwave's location - it was sitting on the interior wall and of course you would never know what kind of obstacles you may encounter on the way through the stud and joist cavities!
However everything were resolved successfully, all obstacles were overcome and this microwave hood was vented the way you can see it in the picture on the left bottom!
So, here you can see only two pictures - before and after, but what about the other 53 of them that were taken during installation process? No problem, for the price of only $2.50 you can see them all. Just click on the Buy Now button below and get an instant access to 55 high quality pictures with brief explanations to them!
|
|
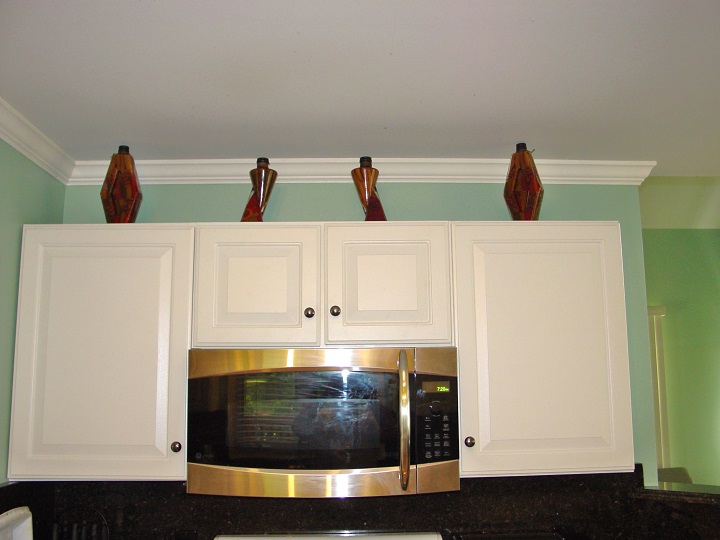
Microwave Exhaust for Small Cabinets
If you have small cabinets there might be not enough room for the factory supplied damper or/and the collar can be off-center and you also cannot use 10" x 4" 6" straight boot and 6" elbow. In this case you have to do something else!
So, for the price of only $2.50 you can learn what should be done. This paid page has 25 high quality pictures with brief explanations.
|
|
Pulte Homes Cold Air Returns
 Pulte Homes is a nationwide home building company and their way of running heat runs and cold air returns differs significantly from the others. In the e-book above I already covered many aspects of their installations, however in my opinion, the most difficult part aka cold air returns in the basements require a special approach. Pulte Homes is a nationwide home building company and their way of running heat runs and cold air returns differs significantly from the others. In the e-book above I already covered many aspects of their installations, however in my opinion, the most difficult part aka cold air returns in the basements require a special approach.
If your company is already working for this Builder and you have some experience this page will help you out to learn the best ways of installation.
If you are planning to work for an HVAC company or you are the owner of an HVAC company that is working for Pulte Homes this page definitely will help you out to learn the best practices and educate your work force.
This is an "installation in pictures" page - no explanations, it's why it priced that low. Let me know if you need detailed explanations or can write them yourself (in this case I'll pay you $50). This page so far has pictures 42 and cover 5 models - more pictures are coming up in the near future.
Price for this page is only $1.34 and in order to get an instant access to the page please click on the PayPal button below.
Instant Access:
After you have purchased a paid page; PayPal is going to bring you back to my website. In order to see the paid page you have to click on the “Register” button, fill out the form, choose your own Username and Password and click on the “Register” button at the bottom of the form – congratulation, you are now on the page you have paid for!
Important: After you have purchased any Paid page or Download page and PayPal brought you back to my website, the first thing that you should do is to save that page to your Favorites. Then if something goes wrong you always can come back to re-register yourself on my website again.
|
|
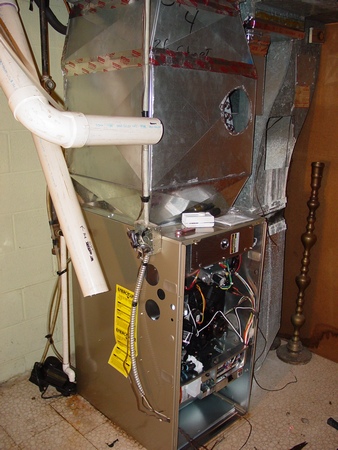
Furnaces, A/C-s Replacements in Apartments
 This page is designed for those who want to see basics of the furnace and air conditioner installation. This is ongoing project and you can order more pictures for any part of it. Currently there are 45 high quality photos on the page and price is only $1.34. This page is designed for those who want to see basics of the furnace and air conditioner installation. This is ongoing project and you can order more pictures for any part of it. Currently there are 45 high quality photos on the page and price is only $1.34. |
|
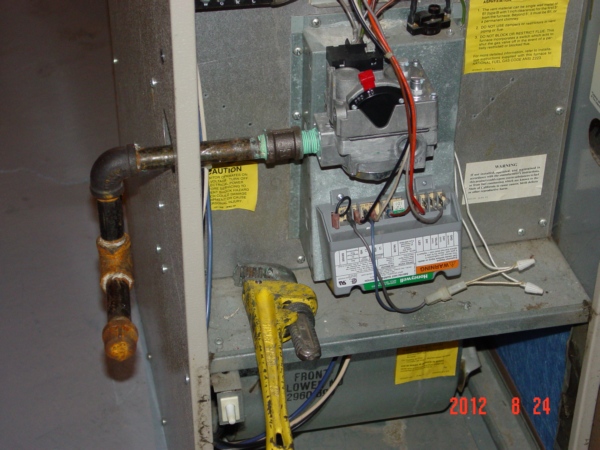
Furnace Replacement in Pictures
 As you may know on the “Furnace Book” page I am selling Paul E. King's book – “The Furnace Book”! As you may know on the “Furnace Book” page I am selling Paul E. King's book – “The Furnace Book”!
In order to help you all to come up with a decision to buy it, I have made the “Furnace Replacement in Pictures” page!
So, here is how I can help you out:
If you come on my website with the questions: Can I install my own furnace? What is a furnace installation? How do I install a furnace vent? Can I see pictures of furnace installation? How do I install 80% furnace? – Now you have a clear opportunity , for the very low price of only $2.50, you can buy an instant access to this page and see all 137 pictures, which include pictures of the tools you may need for the replacement project and pictures of the 80% and 90+% efficiency furnaces replacement with the filter box installation and bypass humidifier replacement!
Furthermore, if you decide to buy “The Furnace Replacement” chapter from my "Ductwork Installation Guide" without purchasing the “Furnace Replacement in Pictures” page it is already included in the package anyway!
Installation on the paid page might not exactly describe your upcoming project. However, it will give you an important example on how this type of installation should be done. In addition, it will open the gates for as many questions as necessary to make sure that the job is done right.
In order to gain an access to this page you have to pay an access fee of $2.50. Just click on the “Buy Now” button below. Once you pay, you will gain an instant access to the page!
Instant Access:
After you have purchased a paid page; PayPal is going to bring you back to my website. In order to see the paid page you have to click on the “Register” button, fill out the form, choose your own Username and Password and click on the “Register” button at the bottom of the form – congratulation, you are now on the page you have paid for!
Important: After you have purchased any Paid page or Download page and PayPal brought you back to my website, the first thing that you should do is to save that page to your Favorites. Then if something goes wrong you always can come back to re-register yourself on my website again.
A Guide to Residential Wood Heating
Heating with wood can be challenging because it takes more active involvement than with other heating systems. Special knowledge and skills are also needed to successfully use this hands-on home heating option. If you heat with wood or are considering doing so, this comprehensive guide will provide you with the information you need to make sure your wood heat system is safe and efficient. You will also find helpful tips on how to effectively operate and maintain it.
Free Download Included |
|
My DIY Projects
 In sixrteen years of living in my house, I was involved in the numerous DIY projects. For example – I painted the garage, insulated the attic, planted the sod, and did a landscaping. In sixrteen years of living in my house, I was involved in the numerous DIY projects. For example – I painted the garage, insulated the attic, planted the sod, and did a landscaping.
On the My DIY Project page you can see pictures of the other projects I was involved in. In addition, there you can find three YouTube players with the videos related to my projects, enjoy!
|
|
My Sedona Vacation
In 2012 I’ve bee n on vacation in Sedona, AZ. n on vacation in Sedona, AZ.
As you can see in the photos below, this small town has gorgeous terrain, but their stupid traditions of the HVAC rooftop unit installations significantly diminish beauty of this place.
My wife and I were renting a condo on the second floor of the condo building and in the photos below you can see how those rooftop package units look like up on the roof.
|
|
My Sanibel Vacation

"... Sanibel Island is world renowned for its shelling beaches and the "Sanibel Stoop". In the travel industry Sanibel Island is a top Florida destination for visitors. If you want a truly unforgettable family vacation, holiday, wedding, honeymoon, anniver
sary or get-away, this is the place to be. Visit Sanibel Island and do it all… or just lay back on the beach with the book you’ve been wanting to read or… just do absolutely nothing. All this is just a short ride from Fort Myers International Airport, Florida."
In 2013 my wife and I took a vacation and stayed on this island for a week.
|
|
My New Orleans Vacation
 From Wikipedia: From Wikipedia:
"The city is named after the Duke of Orleans, who reigned as Regent for Louis XV from 1715 to 1723, as it was established by French colonists and strongly influenced by their European culture. It is well known for its distinct French and Spanish Creole architecture, as well as its cross-cultural and multilingual heritage. New Orleans is also famous for its cuisine, music (particularly as the birthplace of jazz), and its annual celebrations and festivals, most notably Mardi Gras, dating to French colonial times. The city is often referred to as the "most unique" in the United States."
In October of 2015 my wife and I took a vacation to visit this "unique" city for four days.
|
|
|
A website "ductworkinstallation. com" focus on providing information and services related to the installation of ductwork systems , which are the tubes used to distribute heated or cooled air throughout a building as part of an HVAC system; essentially, it would be a platform for individuals or companies specializing in designing and installing ductwork for homes and commercial properties, offering details on the process, and potential contractors to contact for such services.
Key points about ductwork installation websites:
Services offered:
New ductwork installation, ductwork repair, duct cleaning, duct sealing, airflow balancing.
Target audience:
Homeowners looking to install a new HVAC system, individuals experiencing issues with their existing ductwork, commercial property owners needing ductwork for large buildings.
Information provided:
Explanations on different types of duct materials, design considerations for optimal airflow, potential benefits of proper ductwork installation.
|
Bessey D-BKWH Quick-Change Folding Utility Knife
Customer Review
I've been a big fan of these folding utility knives for as long as they've been around. This one is absolutely amazing. Truly "Buck knife" quality in a folding utility knife.
You can't even begin to see the quality in the picture - I was really surprised when I got it in the mail. Heavy aluminum frame with nice polished wood accent.
Everyone should have one of these! |
Olympia Tools 29-585 7Pc Gold Series Sae Nut Driver Set
From the Manufacturer
OLYMPIA TOOLS 29-585 7PC GOLD SERIES™ SAE NUT DRIVER SET Double-injected, ergonomic handles prevent slippage during use. Easy identification with color-coded collars and base printing. 3/16" 1/4" 5/16" 11/32" 3/8" 7/16" 1/2" A comprehensive selection of quality SAE nut drivers for everyday projects - designed to make your job easier! |
Milwaukee 6523-21 Super Sawzall 13 Amp Reciprocating Saw with Rotating Handle
From the Manufacturer
The new Milwaukee rotating handle orbital Super Sawzall reciprocating saw provides the ultimate in power and versatility. It has a 360 degree rotating handle, locks at 45 degree increments, and can continuously rotate without going back to starting position. The trigger can stay on while rotating, providing optimal user comfort in various cutting applications. The saw has a high powered 13 amp Milwaukee built motor for fast orbital cutting action. The variable speed trigger provides 0 to 3000 strokes per minute with a 1-1/4 inch stroke. Other features include a speed dial for repetitive cuts, counter balance for smoother operation with less vibration, and gear protecting clutch for longer tool life. A Quik-Lok blade clamp provides fast and easy blade changes. The 6523-21 also has a Quik-Lok cord for easy field replacement and comes with an impact resistant carrying case. |
Milwaukee 49-22-8510 Right Angle Drill Attachment Kit
Product Description
Milwaukee's Right Angle Attachment allows contractors to drive screws and drill holes in tight, difficult work areas. This attachment is ideal for cordless drills and uses standard 1/4- inch hex accessories. It has a durable all-metal housing and steel gears with ball bearing construction which allows this adapter to handle up to 235 in.-lbs. of torque. The compact design measures only 2 inches wide allowing it to fit in tight spaces where work is difficult to perform. The convenient quick change chuck accepts standard 1/4-inch hex drive accessories. |
Makita LXFD01CW 18-Volt Compact Lithium-Ion Cordless
Customer Review
Why did I suffer with my old one for so long? This thing is great! Powerful, has a light directed toward the drill bit, easy to use, came fully charged. |
Stanley 89-870 8-Inch Long Nose Plier with Cutter
Customer Review
These Stanley needle-nose pliers are better than most because they're designed so they won't pinch your index finger. |
Ultimate Scratch Marking Awl Scribe
Customer Review
This is a product that you only need to buy once. It is 100% steel and will last a lifetime. You can put this Awl right through plywood with one stab; if you wanted to. Stop reading the reviews and buy it already. |
Wiss M4R HVAC Pipe and Duct Cutter
Product Features
Ideal for cutting metal pipe and duct
Removes 11/64-Inch wide strip of metal and curls it away from hands
Offset handles help protect hands and improve maneuverability |
Malco DS1 Straight Body Duct Stretcher
Product Description
Use the Duct Stretcher to hold duct in place with one hand while slipping drive cleat in place with other hand. Low profile, duct stretchers are designed to go anywhere, even in the tightest quarters. Additional spacing holes allow wheels to be adjusted to span greater distances. Rugged anodized aluminum body features large vinyl cushion grip and handy hang-up hole. |
Malco #24 Rad Divider
Product Description
Accurate and fast adjusting. Two sizes for circles up to 32 (81 cm) and 42 (107 cm). Points are easily re-sharpened or replaced. Nickel plated steel body. |
Malco FDC1 4-38-Inch Cut Capacity 12-Inch Flex Duct Cutter with Built-in Wire Cutter
Product Description
Built-in wire cutter lets you finish the job you started with just one tool! Double edged blade cleanly pierces through outer skin and insulation. Cuts from either direction around entire circumference of duct. Finely honed blade is long lasting stainless steel. Wire cutter cuts hardened wire rib coil.
Double-edged knife blade cleanly pierces through outer skin, insulation and liner of flexible round duct. Blade cuts both directions, from any angle and around entire duct circumference. Duct’s exposed wire rib coil can be snipped in the jaws of the built-in wire cutter. Non-slip vinyl grips with hand stops. |
Malco HC-2 Sheet Metal Hole Cutter
Product Features
Lightweight aluminum frame High speed bearings at top and bottom of drill shaft to assure perfect cutting balance and long cutting life.
It will install into the chuck of a standard electric drill as small as 1/4-Inch
Stores easily in a tool box
Replaceable cutting bits
Customer Review
This tool is the ticket. I have been doing maintenance work for some 40 years now and in my "favorite tool" box this is kept. I took on project of replacement and upgrade of my home HVAC duct system and without this I would have had many stitches from sheet metal snips. If you work with duct work and you like professional results get one of these. Great tool!!
|
|