|
Remodeling a Basement: Expert Advice from Start to Finish
Book Description
Publication Date: April 1, 2004
Finishing a basement is one of the fastest and most cost-effective ways to increase living space in a home. This book helps readers visualize the vast possibilities that exist for this challenging space, and go about the remodeling process in an organized and efficient way. Roger German, a basement remodeling pro, covers every step, from the physically demanding "dirty work" to the rewarding finishing touches. He shows how to deal with a basement's special challenges, such as moisture problems and framing against concrete floors and walls, and gives instructions on pumping water up and out from basement baths and laundry rooms.
Customer Review
The information was very valuable to me both within my home and conducting my job .It assisted me in making recommendations for my client, reinforces my knowledge base, and improves my skills level. This is a book I would recommend to just about anyone who wants to improve their knowledge and add a resourceful tool to their collection. This book is like a tool to me. |
|
Remodeling a Basement Revised Edition
Book Description
Publication Date: January 5, 2010 Finishing a basement is one of the easiest and most cost-effective ways to increase living space and the value of a home. This new edition of a classic bestseller is updated to the latest code. The book includes new information about egress windows and takes readers through the entire remodeling process, showing how to construct new family rooms, bathrooms, laundry rooms, workshops, and hobby rooms. Filled with inspiring photos of finished basements, the latest “Build like a Pro” release is packed with nuts-and-bolts information about wiring, plumbing, windows, and doors, as well as basic construction techniques and the special problems that arise with basement building. This hands-on guide will help homeowners and contractors get the job done right the first time.
Customer Review
This book has helped me finish two basements in the last 5 years. Both basement projects were very different in their requirements, but the advice in this book was invaluable for both. I highly recommend that you purchase and use this book for a basement finishing project. The framing section in particular was very helpful. I do wish that it had had a section discussing using conduit in walls instead of just Romex; since I live in the Chicago are which does not allow Romex in new construction. |
|
Black & Decker the Complete Guide to Finishing Basements: Step-by-step Projects for Adding Living Space without Adding On
Book Description Publication Date: April 1, 2009. Creating extra living space affordably has never been easier. This book shows dozens of different uses for basement spaces, then shows readers exactly how to accomplish each task. Painstakingly clear photos leave nothing to the imagination, as they teach consumers exactly how to handle modern materials and tools to add an extra bathroom, a family room, bedroom, home office, or game room to their homes.
Customer Review
Very impressed. Lessons and skills taught in this book extend to a wide variety of projects - useful in multiple areas of the house. I would highly recommend.
|
Basement Design Guide
Book Description
Publication Date: September 4, 2007 If your basement needs more than a fresh coat of paint, the Basement Design Guide is a great place to start. The book offers practical advice on how to get started, step-by-step instructions on designing and planning the project, as well as tips to staying on budget. If you're looking for some visual guidance, there is a section of photos that showcase attainable basements complete with the newest design trends, from paneling to lighting to home entertainment centers.
Customer Review
We are in the "dreaming" phase of our basement remodel. I checked this book out from our local library along with 6 others and this was, by far, the best of the bunch. It provides you with a ton of different pics of basements with a variety of design purposes (i.e. media room, workout space, playroom, bedroom, etc.). In addition, it clearly outlines valuable points to consider with each aspect of the design (e.g. the pros and cons of each flooring choice). I would HIGHLY recommend this book to anyone who is thinking about remodeling their space and needs to see possible ideas to flesh out exactly what they want before contacting a contractor or architect. This book is truly a lifesaver...I even bought my own copy after I couldn't renew it from the library any more!! |
|
|
Doing ductwork installation sounds like a job that must be done by a professional. You may be surprised to know that by following my simple instructions, you can install your own ductwork in no time.
This e-book is about doing your own ductwork. Doing your own ductwork has significant financial advantages. You may be surprised to learn that installing your own ductwork in your finished basement project may save you a lot of money.
Usually, this task seems very complicated without some prior knowledge of the subject. But this handy e-book was designed for your first time through a ductwork installation. It will guide you through each step of the installation process. During the process of installing your new ductwork, I will be there with you offering step-by-step “how to” instructions.
Also, this e-book is useful if you are a professional ductwork installer! Depending on what you are doing every day at work it will bring you knowledge and understanding equal from 5 up to 10 years of experience!
And you are not alone. To meet growing demand for the most popular pages on my website I’ve combined all the pages from my website dedicated to the finished basement issues and sell it as a “Ductwork Installation Guide, Finished Basement Edition” e-book.
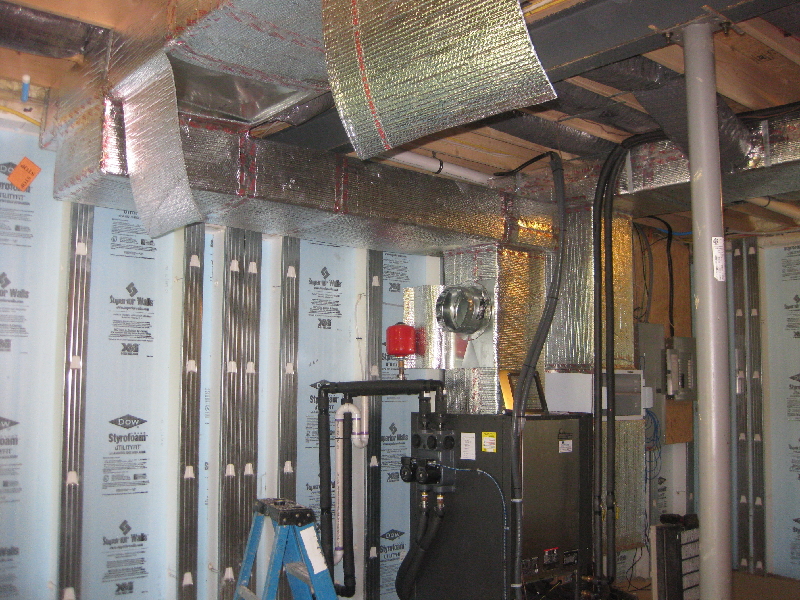
Nine pages for the Finished Basement Edition Guide have been taken from the “Professionally Answered Questions” page, nine from the “Installation in Pictures” page, two from the “ Ductwork Installation Guide” e-book, two from the “Energy Saving Tips" e-book and one from the “Ductwork Installation Tips and Tricks”.
So if you decide to finish the basement on your own you are going to have a complete guidance which includes everything that you need to know to finish the project! Furthermore, all pages from “Installation in Pictures” page are including step-by-step explanations to them too!
As I’ve mentioned above all chapters of the “Finished Basement Edition Guide” e-book are presented on my website and designed to help anyone who is finishing his/her basement off:
 1. Cold Air Return for Basement - This chapter in two instances gives a description of the cold air return installation on the wall which separates mechanical room from the rest of the finished basement. In this chapter you can see pictures of all necessary tools and materials and pictures of the system elements installed. All installation is divided into six steps. Also you can learn how to measure, cut, put together and crimp a round pipe. The chapter has 40 pictures; 18 pages. 1. Cold Air Return for Basement - This chapter in two instances gives a description of the cold air return installation on the wall which separates mechanical room from the rest of the finished basement. In this chapter you can see pictures of all necessary tools and materials and pictures of the system elements installed. All installation is divided into six steps. Also you can learn how to measure, cut, put together and crimp a round pipe. The chapter has 40 pictures; 18 pages.
 2. Cold Air Return from Interior Wall – This chapter in three instances gives a description of the cold air return installation from the inner wall, which separates two rooms in the finished basement. In this chapter you can see pictures of all necessary tools and materials and pictures of the system elements installed. All installation is divided into three steps. All installation is divided into six steps. Also you can learn how to measure, cut, put together and crimp a round pipe. The chapter has 34 pictures; 12 pages.. 2. Cold Air Return from Interior Wall – This chapter in three instances gives a description of the cold air return installation from the inner wall, which separates two rooms in the finished basement. In this chapter you can see pictures of all necessary tools and materials and pictures of the system elements installed. All installation is divided into three steps. All installation is divided into six steps. Also you can learn how to measure, cut, put together and crimp a round pipe. The chapter has 34 pictures; 12 pages..
 3. Return from Exterior Wall in Basement – This chapter in two instances gives a description of the cold air return from the interior walls installation. One cold air return is connected to the end and another one to the middle of a cold air duct. In this chapter you can see pictures of all necessary tools and materials and pictures of the system elements installed. The Chapter has 29 pictures; 9 pages. 3. Return from Exterior Wall in Basement – This chapter in two instances gives a description of the cold air return from the interior walls installation. One cold air return is connected to the end and another one to the middle of a cold air duct. In this chapter you can see pictures of all necessary tools and materials and pictures of the system elements installed. The Chapter has 29 pictures; 9 pages.
 4. Double Cold Air Return Installation – In this chapter you can find a description of the double cold air return installation on the wall which separates mechanical room from rest of the basement. Here you can see pictures of all materials and tools necessary for installation. Pictures, which represent installation, are set in the sequence in which the installation should be executed. The chapter has 60 pictures; 27 pages. 4. Double Cold Air Return Installation – In this chapter you can find a description of the double cold air return installation on the wall which separates mechanical room from rest of the basement. Here you can see pictures of all materials and tools necessary for installation. Pictures, which represent installation, are set in the sequence in which the installation should be executed. The chapter has 60 pictures; 27 pages.
 5. Ducted Cold Air Return - This chapter gives a description of a cold air return installation in the closet. Here you can see pictures of all materials and tools necessary for installation. 5. Ducted Cold Air Return - This chapter gives a description of a cold air return installation in the closet. Here you can see pictures of all materials and tools necessary for installation.
Pictures which represent installation and explanations are set in the sequence in which the installation should be executed. The chapter has 6 pictures; 7 pages.
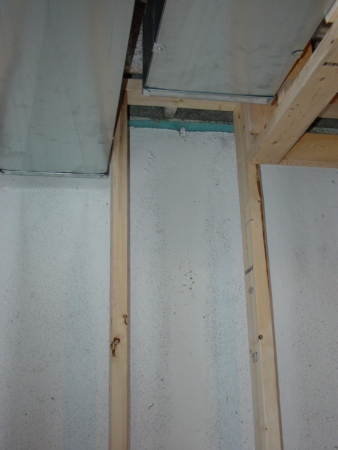
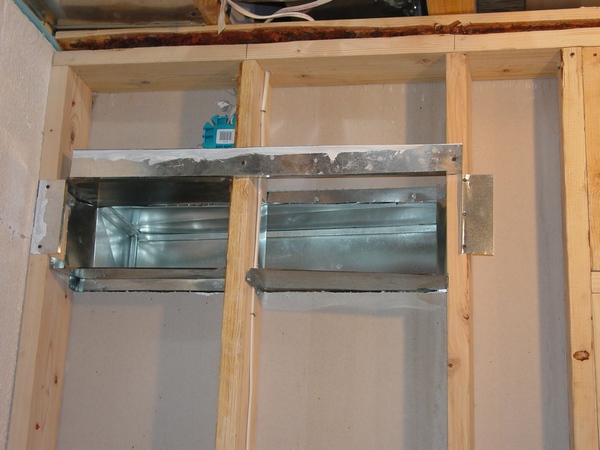
6. How to Extend Heat Ducts to Floor – This chapter gives a description of three heat duct installations two in interior and one in exterior wall. In one instance it separates mechanical room from the rest of the finished basement. In another, a storage room from the bathroom. In this chapter you can see pictures of all necessary tools and materials and pictures of the system elements installed. All installation is divided into four steps. On 03/07/2019 eleven pictures and two types of installations in the exterior walls were added. The chapter has 28 pictures; 14 pages.
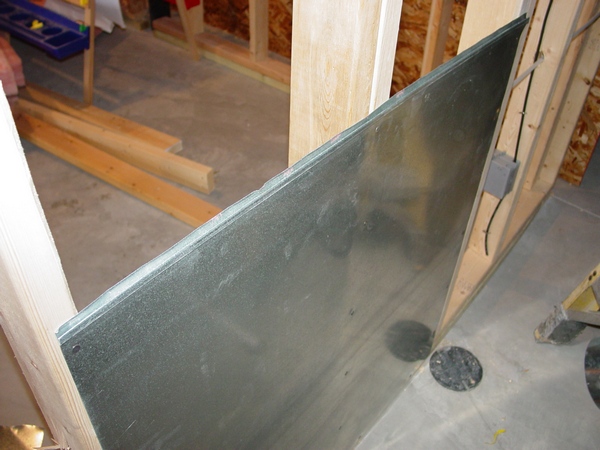
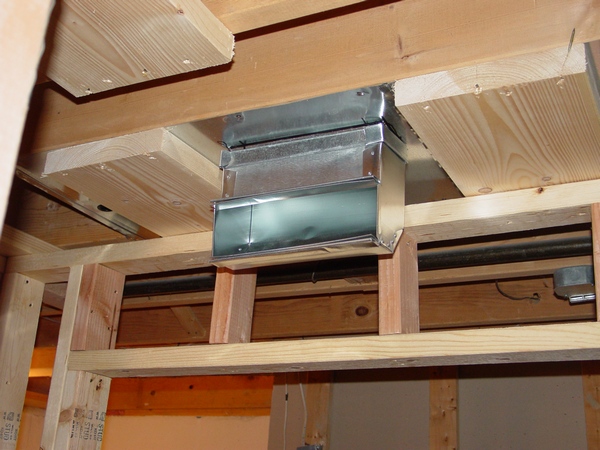
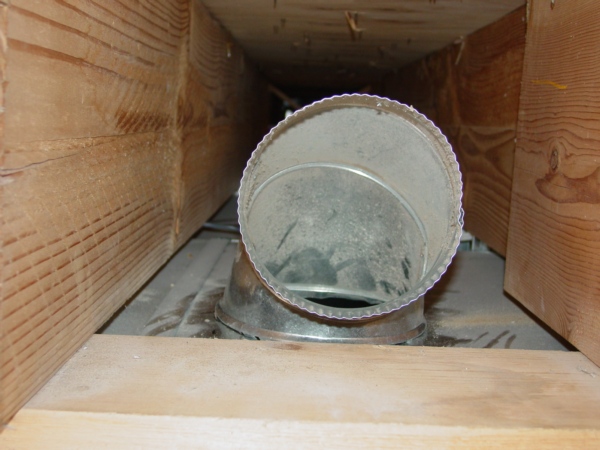
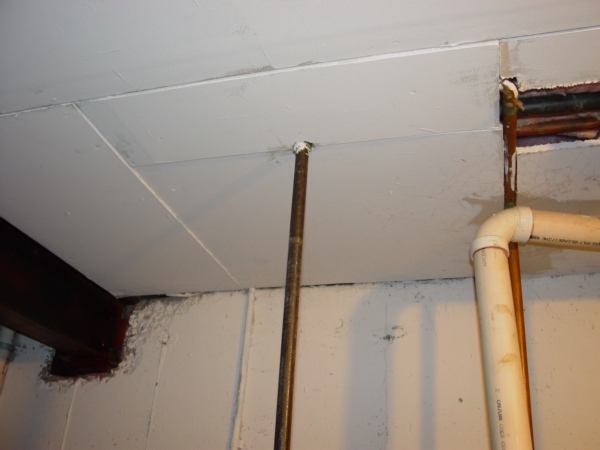
7. How to Drop a Register to Ceiling - This chapter gives a description of a sheet metal sleeve installation that is a necessary element for a supply register that connects it to the duct. In this page, you can see pictures of all necessary tools and materials and pictures of the system elements installed. All installation is divided into five steps. This chapter has 20 pictures; 7 pages.
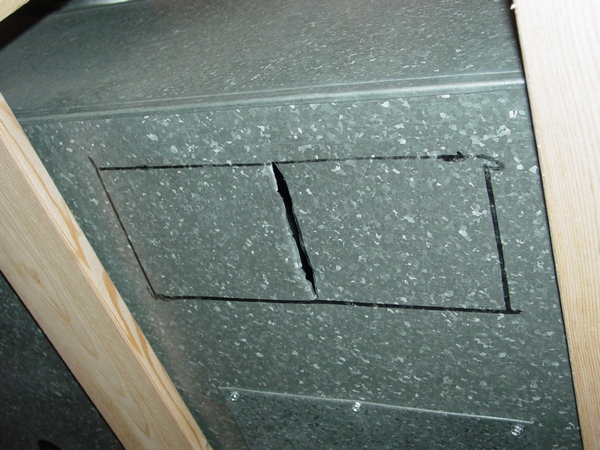 8. How to Drop a Register to Shallow Ceiling - In this chapter you can find another way of how to drop a register to the soffit right below the duct. There are 19 pictures of all necessary tools, materials and installation. All installation is divided into four steps. The chapter has 9 pages. 8. How to Drop a Register to Shallow Ceiling - In this chapter you can find another way of how to drop a register to the soffit right below the duct. There are 19 pictures of all necessary tools, materials and installation. All installation is divided into four steps. The chapter has 9 pages.
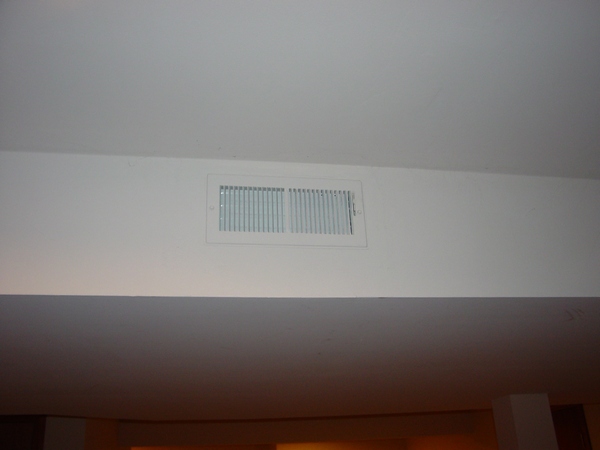
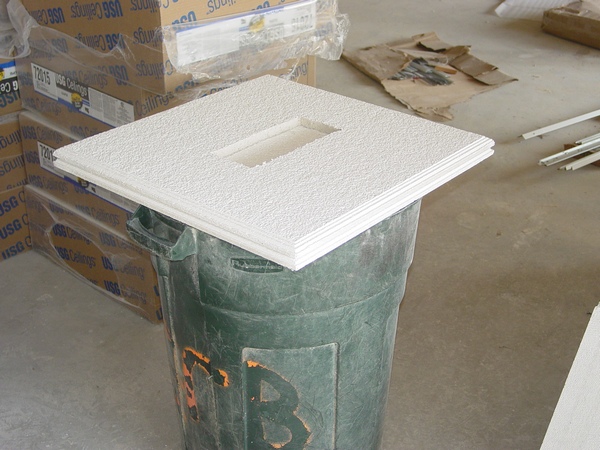 9. Register Installation on Ceiling Tile - This chapter gives a description of the register installation on the ceiling tile. In this chapter you can see pictures of all necessary tools and materials and pictures of the system elements installed. All installation is divided into four steps.The chapter has 18 pictures; 5 pages. 9. Register Installation on Ceiling Tile - This chapter gives a description of the register installation on the ceiling tile. In this chapter you can see pictures of all necessary tools and materials and pictures of the system elements installed. All installation is divided into four steps.The chapter has 18 pictures; 5 pages.
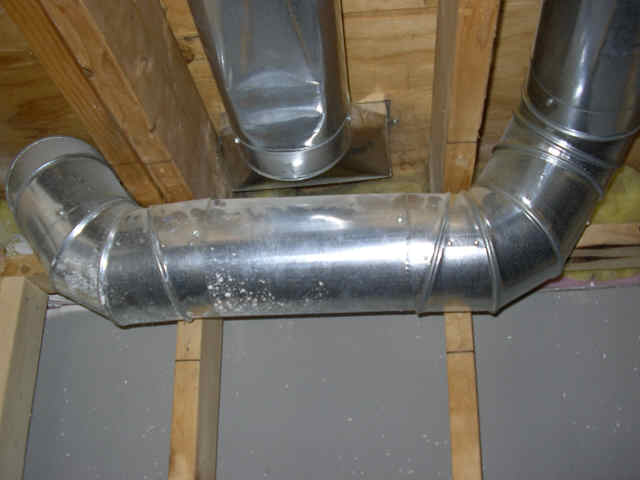 10. Rerun of Heat Run - In this chapter you can find a description of how to rerun a heat run, which is set in the middle of the basement's ceiling in a more suitable area for your finished basement project. In the chapter you can learn about 3 instances of such relocations. 10. Rerun of Heat Run - In this chapter you can find a description of how to rerun a heat run, which is set in the middle of the basement's ceiling in a more suitable area for your finished basement project. In the chapter you can learn about 3 instances of such relocations.
Pictures and explanations that represent installation are set in the sequence in which the installation should be executed. The chapter has 21 pictures; 11 pictures.
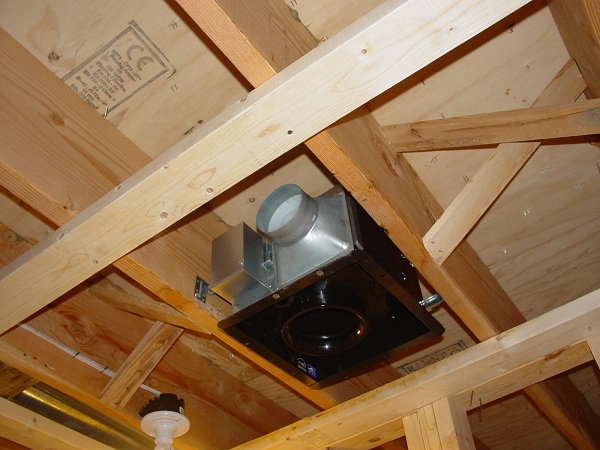
11. Bath Fan Exhaust through Brick Wall – In this chapter you can find out how to run the bath fan exhaust through the brick wall. In this chapter you can see pictures of all necessary tools and materials and pictures of the system elements installed. All installation is divided into four steps. This chapter has 27 pictures; 10 pages.
 12. Venting of Two Bathroom Fans – In this chapter you can find out how to run two bath fan exhausts through one opening in the brick wall. In the chapter you can see pictures of all necessary tools and materials and pictures of the system elements installed. The chapter has 37pictures; 8 pages. 12. Venting of Two Bathroom Fans – In this chapter you can find out how to run two bath fan exhausts through one opening in the brick wall. In the chapter you can see pictures of all necessary tools and materials and pictures of the system elements installed. The chapter has 37pictures; 8 pages.
 13. Tap Take-off into Existing Duct – In this chapter you can find out how to add duct lines by tapping into the existing ductwork. The chapter contains 6 pictures; 5 pages. 13. Tap Take-off into Existing Duct – In this chapter you can find out how to add duct lines by tapping into the existing ductwork. The chapter contains 6 pictures; 5 pages.
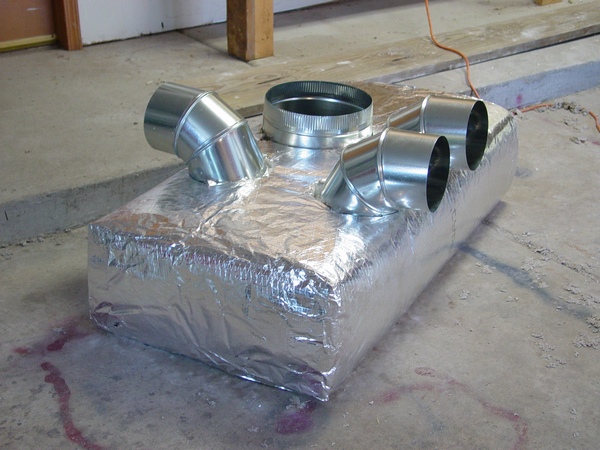
14. B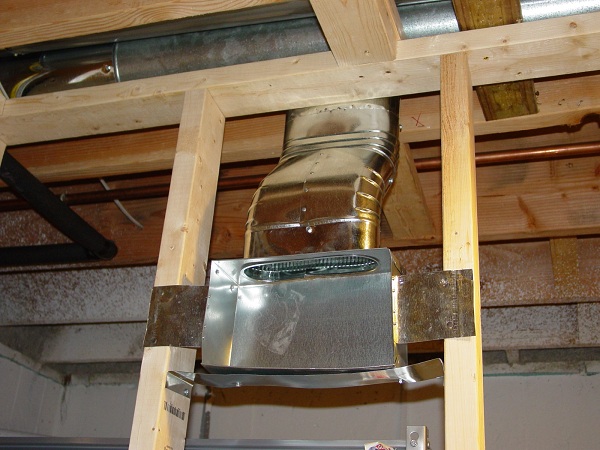 athroom Heat for Finished Basement (Installation in pictures) If your bathroom is located somewhere in the middle of your finished basement, you do not need to supply too much air into it. You just need a vent to compensate air losses to the bath fan and not much else. athroom Heat for Finished Basement (Installation in pictures) If your bathroom is located somewhere in the middle of your finished basement, you do not need to supply too much air into it. You just need a vent to compensate air losses to the bath fan and not much else.
On this page, you will learn how to tee-off an existing duct, which is working for the adjacent storage room in order to rout some air to the bathroom. On the page, you can see 12 pictures of the tools and materials and 7 pictures.
 15. Tapping Two Heats for Finished Basement – In this chapter you can learn how to tap in two heat runs and how to terminate them on the drop ceiling. The chapter has 52 pictures; 15 pages. 15. Tapping Two Heats for Finished Basement – In this chapter you can learn how to tap in two heat runs and how to terminate them on the drop ceiling. The chapter has 52 pictures; 15 pages.
 16. Duct Span Removal - In this page you can find a detailed explanation on how to remove a span of duct and how to put it back together. This chapter has 14 pictures; 7 pages. 16. Duct Span Removal - In this page you can find a detailed explanation on how to remove a span of duct and how to put it back together. This chapter has 14 pictures; 7 pages.
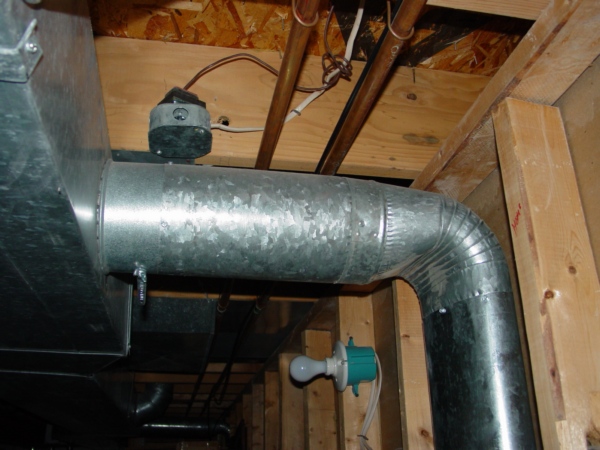
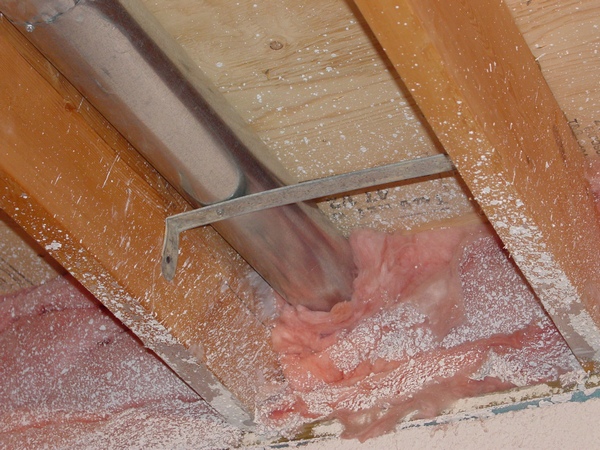
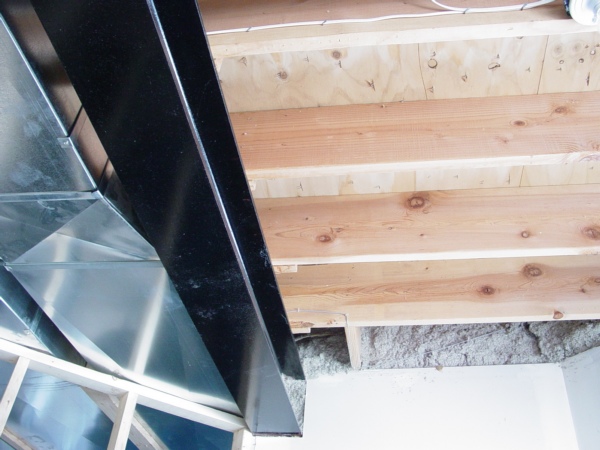
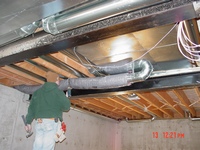
 17. Ductwork Relocation – In this chapter you will learn how bring a low hanging duct up in the joist space. This chapter has 17 pictures; 8 pages. 17. Ductwork Relocation – In this chapter you will learn how bring a low hanging duct up in the joist space. This chapter has 17 pictures; 8 pages.
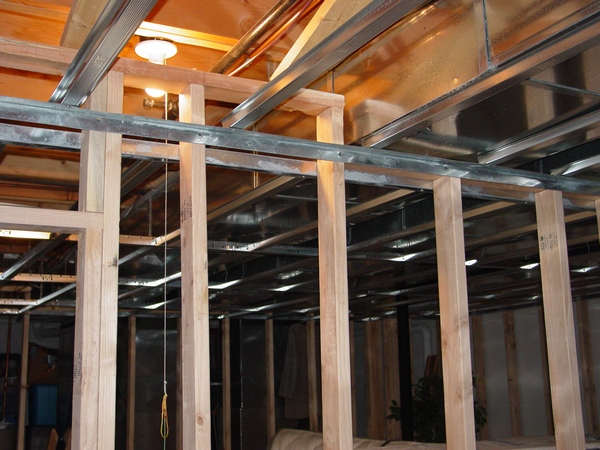
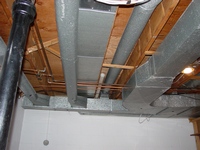
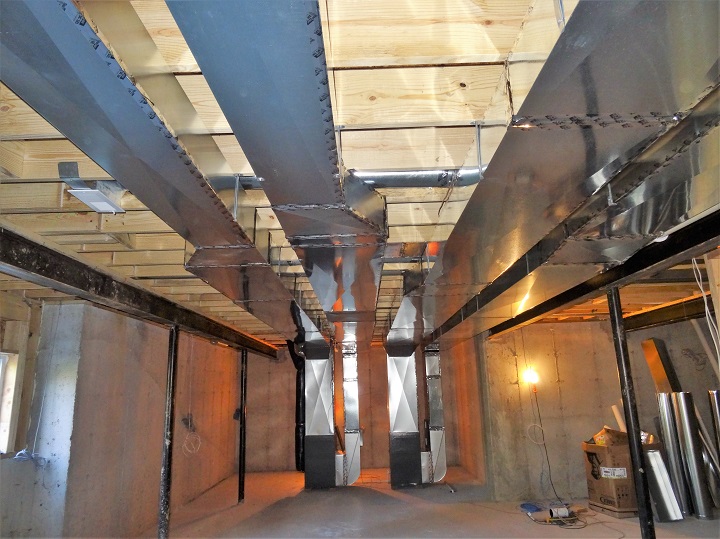
 18. Zoning – This chapter presents all aspects regarding ductwork installation in the finished basement. The chapter describes how to install a zoning system, heat runs, cold air returns, and bath fan exhausts. Also the chapter explains how to deal with the different types of the drop ceiling, wood and metal studs. 18. Zoning – This chapter presents all aspects regarding ductwork installation in the finished basement. The chapter describes how to install a zoning system, heat runs, cold air returns, and bath fan exhausts. Also the chapter explains how to deal with the different types of the drop ceiling, wood and metal studs.
The chapter has 51 pictures; 31 pages
 19. Installation of Combustion Air Intake - This chapter has all necessary information for anyone who decided to run a combustion air intake. It’s explains what to do if you have a brick or siding wall and how to run it inside of your basement. In the chapter you can find all necessary materials and tools for the project with step by step explanations. This chapter has 10 pictures; 6 pages. 19. Installation of Combustion Air Intake - This chapter has all necessary information for anyone who decided to run a combustion air intake. It’s explains what to do if you have a brick or siding wall and how to run it inside of your basement. In the chapter you can find all necessary materials and tools for the project with step by step explanations. This chapter has 10 pictures; 6 pages.
 20. Installation of Fresh Air Intake - This chapter gives a description of installation of the fresh air Intake, which is a necessary element of your HVAC system. In this chapter you can see pictures of all necessary tools and materials and pictures of the fresh air intake installed. All installation is divided into six steps. This page has 43 pictures; 15 pages. 20. Installation of Fresh Air Intake - This chapter gives a description of installation of the fresh air Intake, which is a necessary element of your HVAC system. In this chapter you can see pictures of all necessary tools and materials and pictures of the fresh air intake installed. All installation is divided into six steps. This page has 43 pictures; 15 pages.
 21. Useful Tips and Tricks 21. Useful Tips and Tricks
 22. Sealing Ductwork - Since 02/08/2016 State of Michigan started to enforce changes to its mechanical code. Because of that much more duct, fittings and pipes should be sealed. In the chapter you can find all the examples ductwork being sealed for the Rough-in and Basement applications. The chapter has 30 pictures; 17 pages 22. Sealing Ductwork - Since 02/08/2016 State of Michigan started to enforce changes to its mechanical code. Because of that much more duct, fittings and pipes should be sealed. In the chapter you can find all the examples ductwork being sealed for the Rough-in and Basement applications. The chapter has 30 pictures; 17 pages
 23. Ductwork Insulation - This chapter gives a description of insulation of the existing ducts. This chapter has 14 pictures; 8 pages. 23. Ductwork Insulation - This chapter gives a description of insulation of the existing ducts. This chapter has 14 pictures; 8 pages.
 24. Safety Techniques – The chapter explains how to perform work safely in many instances. The chapter has 8 pictures; 15 pages. 24. Safety Techniques – The chapter explains how to perform work safely in many instances. The chapter has 8 pictures; 15 pages.
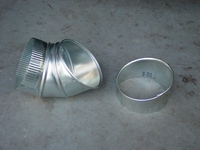
25. 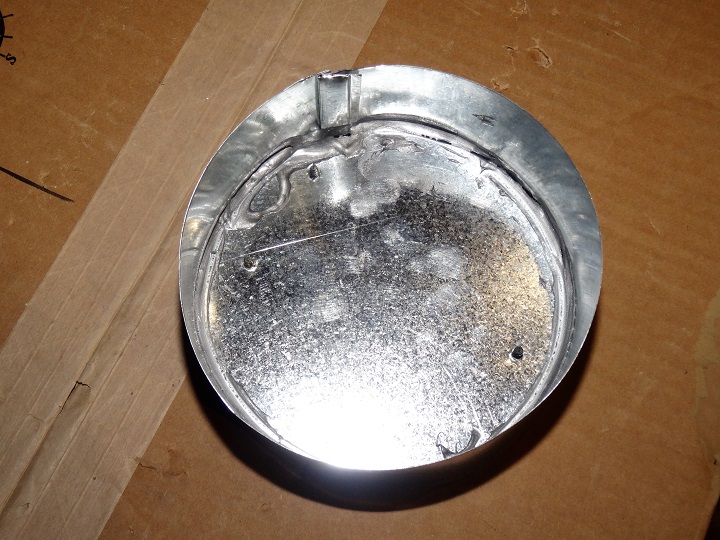 How to Make Round End Cap with Hand Tools - Sometimes, especially when you’re finishing your basement off or working on a finished basement project, you need to relocate a heat run. In some cases you can’t reach to the takeoff to pull it out and block the hole off. Then the best option is to cap a pipe or takeoff off. The tutorial has 8 pictures with explanations. How to Make Round End Cap with Hand Tools - Sometimes, especially when you’re finishing your basement off or working on a finished basement project, you need to relocate a heat run. In some cases you can’t reach to the takeoff to pull it out and block the hole off. Then the best option is to cap a pipe or takeoff off. The tutorial has 8 pictures with explanations.
You can purchase any chapter below and if you purchase the e-book as whole I’ll refund your money back to your PayPal account.
|
|
Finished Basement Edition
Starting from 01/21/2013 after you pay PayPal will redirect you to the Links page where you can to reach all the chapters and open up online versions of them right on this website!
You can buy this e-book for very low price of only $19.99!
Please use the BuyNow Button below and it will open up the Links page for you.
Instant Download and Access:
After you have purchased a paid page, PayPal is going to bring you back to my website. In order to see the paid page you have to click on the “Register” button, fill out the form, choose your own Username and Password and click on the “Register” button at the bottom of the form – congratulation, you are now on the page you have paid for!
Important: After you have purchased any Paid page or Download page and PayPal brought you back to my website, the first thing that you should do is to save that page to your Favorites. Then if something goes wrong you always can come back to re-register yourself on my website again.
I just wanted to take a moment and believe you deserve to know your work shows excellence to detail and is a 1st class online service. I will be back to resource other opportunities when I finish my basement.
Thanks
Ken
Below you can purchase any chapter separately
|
1. Cold Air Return for Basement - This chapter in two instances gives a description of the cold air return installation on the wall which separates mechanical room from the rest of the finished basement. In this chapter you can see pictures of all necessary tools and materials and pictures of the system elements installed. All installation is divided into six steps. Also you can learn how to measure, cut, put together and crimp a round pipe.
The chapter has 40 pictures; 18 pages. The price is $3.00. |
|
2. Cold Air Return from Interior Wall – This chapter in three instances gives a description of the cold air return installation from the inner wall, which separates two rooms in the finished basement. In this chapter you can see pictures of all necessary tools and materials and pictures of the system elements installed. All installation is divided into three steps. All installation is divided into six steps. Also you can learn how to measure, cut, put together and crimp a round pipe. The chapter has 34 pictures; 12 pages. The price is $2.50.
|
 3. Return from Exterior Wall in Basement – This chapter in two instances gives a description of the cold air return from the interior walls installation. One cold air return is connected to the end and another one to the middle of a cold air duct. In this chapter you can see pictures of all necessary tools and materials and pictures of the system elements installed. 3. Return from Exterior Wall in Basement – This chapter in two instances gives a description of the cold air return from the interior walls installation. One cold air return is connected to the end and another one to the middle of a cold air duct. In this chapter you can see pictures of all necessary tools and materials and pictures of the system elements installed.
The Chapter has 29 pictures; 9 pages. The price is $1.86
|
| 4. Double Cold Air Return Installation – In this chapter you can find a description of the double cold air return installation on the wall which separates mechanical room from rest of the basement. Here you can see pictures of all materials and tools necessary for installation. Pictures, which represent installation, are set in the sequence in which the installation should be executed.
The chapter has 60 pictures; 27 pages. The price is $2.50
|
|
 5. Ducted Cold Air Return - This chapter gives a description of a cold air return installation in the closet. Here you can see pictures of all materials and tools necessary for installation. 5. Ducted Cold Air Return - This chapter gives a description of a cold air return installation in the closet. Here you can see pictures of all materials and tools necessary for installation.
Pictures which represent installation and explanations are set in the sequence in which the installation should be executed.
The chapter has 6 pictures; 7 pages. The price is $2.50
|
 6. How to Extend Heat Ducts to Floor – This chapter gives a description of three heat duct installations two in interior and one in exterior wall. In one instance it separates mechanical room from the rest of the finished basement. In another, a storage room from the bathroom. In this chapter you can see pictures of all necessary tools and materials and pictures of the system elements installed. All installation is divided into four steps. 6. How to Extend Heat Ducts to Floor – This chapter gives a description of three heat duct installations two in interior and one in exterior wall. In one instance it separates mechanical room from the rest of the finished basement. In another, a storage room from the bathroom. In this chapter you can see pictures of all necessary tools and materials and pictures of the system elements installed. All installation is divided into four steps.
On 03/07/2019 eleven pictures and two types of installations in the exterior walls were added.
The chapter has 28 pictures; 14 pages. The price is $2.50
|
|
7. How to Drop a Register to Ceiling - This chapter gives a description of a sheet metal sleeve installation that is a necessary element for a supply register that connects it to the duct.
In this page, you can see pictures of all necessary tools and materials and pictures of the system elements installed. All installation is divided into five steps.
This chapter has 20 pictures; 7 pages. The price is $2.50
|
| 8. How to Drop a Register to Shallow Ceiling - In this chapter you can find another way of how to drop a register to the soffit right below the duct. There are 19 pictures of all necessary tools, materials and installation. All installation is divided into four steps.
The chapter has 9 pages. The price is $2.50
|
| 9. Register Installation on Ceiling Tile – This chapter gives a description of the register installation on the ceiling tile. In this chapter you can see pictures of all necessary tools and materials and pictures of the system elements installed. All installation is divided into four steps.
The chapter has 18 pictures; 5 pages. The price is $2.50
|
|
 10. Rerun of Heat Run - On this page, you can find a description of how to rerun a heat run, which is set in the middle of the basement's ceiling in a more suitable area for your finished basement project. In the chapter you can learn about 3 instances of such relocations. 10. Rerun of Heat Run - On this page, you can find a description of how to rerun a heat run, which is set in the middle of the basement's ceiling in a more suitable area for your finished basement project. In the chapter you can learn about 3 instances of such relocations.
Pictures and explanations that represent installation are set in the sequence in which the installation should be executed.
The chapter has 21 pictures; 11 pictures. The price is $2.50
|
|
11. Bath Fan Exhaust through Brick Wall – In this chapter you can find out how to run the bath fan exhaust through the brick wall. In this chapter you can see pictures of all necessary tools and materials and pictures of the system elements installed. All installation is divided into four steps.
This chapter has 27 pictures; 10 pages. The price is $2.50
|
|
 12. Venting of Two Bathroom Fans – In this chapter you can find out how to run two bath fan exhausts through one opening in the brick wall. In the chapter you can see pictures of all necessary tools and materials and pictures of the system elements installed. 12. Venting of Two Bathroom Fans – In this chapter you can find out how to run two bath fan exhausts through one opening in the brick wall. In the chapter you can see pictures of all necessary tools and materials and pictures of the system elements installed.
The chapter has 37pictures; 8 pages. The price is $1.86
|
 13. Tap Take-off into Existing Duct – In this chapter you can find out how to add duct lines by tapping into the existing ductwork. 13. Tap Take-off into Existing Duct – In this chapter you can find out how to add duct lines by tapping into the existing ductwork.
The chapter contains 6 pictures; 5 pages. The price is $2.50.
|
|
14. Bathroom Heat for Finished Basement (Installation in pictures)
If your bathroom is located somewhere in the middle of your finished basement, you do not need to supply too much air into it. You just need a vent to compensate air losses to the bath fan and not much else.
On this page, you will learn how to tee-off an existing duct, which is working for the adjacent storage room in order to rout some air to the bathroom.
On the page, you can see 12 pictures of the tools and materials and 7 pictures. The price is $1.86 |
|
 15. Tapping Two Heats for Finished Basement – In this chapter you can learn how to tap in two heat runs and how to terminate them on the drop ceiling. 15. Tapping Two Heats for Finished Basement – In this chapter you can learn how to tap in two heat runs and how to terminate them on the drop ceiling.
The chapter has 52 pictures; 15 pages. The price is $2.37
|
|
16. Duct Span Removal - In this page you can find a detailed explanation on how to remove a span of duct and how to put it back together.
This chapter has 14 pictures; 7 pages. The price is $2.50
|
|
 17. Ductwork Relocation – In this chapter you will learn how bring a low hanging duct up in the joist space. 17. Ductwork Relocation – In this chapter you will learn how bring a low hanging duct up in the joist space.
This chapter has 17 pictures; 8 pages. The price is $2.50
|
|
18. Z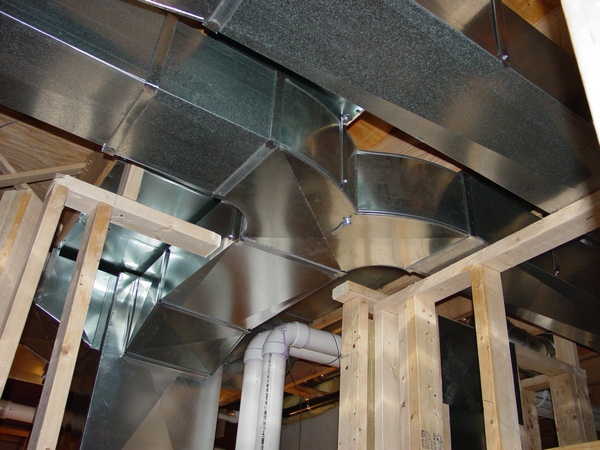 oning – The chapter presents all aspects regarding ductwork installation in the finished basement. oning – The chapter presents all aspects regarding ductwork installation in the finished basement.
The chapter describes how to install a zoning system, heat runs, cold air returns, and bath fan exhausts. Also the chapter explains how to deal with the different types of the drop ceiling, wood and metal studs.
The chapter has 51 pictures; 31 pages*. $10.62 (Instant Access).
On 04/05/2015 text of this chapter was significantly modified and improved. On 08/13/2017 one more picture was added. |
|
19. Installation of Combustion Air Intake - This chapter has all necessary information for anyone who decided to run a combustion air intake. It’s explains what to do if you have a brick or siding wall and how to run it inside of your basement. In the chapter you can find all necessary materials and tools for the project with step by step explanations.
This chapter has 10 pictures; 6 pages. The price is $2.50
|
|
20. Installation of Fresh Air Intake - This chapter gives a description of installation of the fresh air Intake, which is a necessary element of your HVAC system. In this chapter you can see pictures of all necessary tools and materials and pictures of the fresh air intake installed. All installation is divided into six steps.
This page has 43 pictures; 15 pages. The price is $1.86
|
|
22. Duct Sealing - Since 02/08/2016 State of Michigan started to enforce changes to its mechanical code. Because of that much more duct, fittings and pipes should be sealed. In the chapter you can find all the examples ductwork being sealed for the Rough-in and Basement applications.
The chapter has 30 pictures; 17 pages. The price is $1.34 |
|
 23. Ductwork Insulation - This chapter gives a description of insulation of the existing ducts. 23. Ductwork Insulation - This chapter gives a description of insulation of the existing ducts.
This chapter has 14 pictures; 8 pages. The price is $2.50
|
|
 24. Safety Techniques – The chapter explains how to perform work safely in many instances. 24. Safety Techniques – The chapter explains how to perform work safely in many instances.
The chapter has 8 pictures; 15 pages. The price is free
|
|
25. How to Make Round End Cap with Hand Tools - Sometimes, especially when you’re finishing your basement off or working on a finished basement project, you need to relocate a heat run. In some cases you can’t reach to the takeoff to pull it out and block the hole off. Then the best option is to cap a pipe or takeoff off. The tutorial has 8 pictures with explanations. The price is $1.00.
|
New!
If you don't need all 24 chapters of the Finished Basement Edition e-book that's fine! Pick the chapters you need, add more paid pages from the other parts of this website at discount price, create your own e-book on this page - and save! |
|
Finished Basement Edition, Installation in Pictures
As we all know, a picture is worth a thousand words!
In this e-book, you can see pictures of dozens tool and materials and 152 high quality photos of actual installations, which represent all aspects of installation in the step-by-step sequence!
This e-book has 12 chapters in it:
- Basement Cold Air Return in Pictures
- Double Cold Air Return Installation
- Ducted Cold Air Return
- Return from Exterior Wall in Basement
- Two Cold Air Returns from Interior Wall
- Bathroom Heat for the Finished Basement
- Rerun of the Heat Runs
- Tapping Two Heats for Finished Basement
- Combustion Air Intake Installation in Pictures
- Finished Basement Kitchen Hood
- Venting of Two Bathroom Fans
- Double Return for Finished Basement Installation in Pictures
Together with the Finished Basement Edition book, here you can find almost all possible cases of the finished basement ductwork installation. It is why I would recommend you to purchase them both.
However, this particular book has its very significant value too. For example if you are a professional installer you don't need a detailed explanation on how to measure, cut and crimp a pipe and so on, but because nobody is doing this kind of work on a daily basis this e-book would be a great tutorial for any of you!
For the same reason if you a homeowner and hire an HVAC Company you need to know what they are doing and show them a picture or two of how this or that should be done!
- You can purchase an instant access to the Finished Basement Edition, Installation in Pictures book for the low price of only $8.62.
Instant Access
After you have purchased a paid page, PayPal is going to bring you back to my website. In order to see the paid page you have to click on the “Register” button, fill out the form, choose your own Username and Password and click on the “Register” button at the bottom of the form – congratulation, you are now on the page you have paid for!
Important: After you have purchased any Paid page or Download page and PayPal brought you back to my website, the first thing that you should do is to save that page to your Favorites. Then if something went wrong you always can come back to re-register yourself on my website again. |
|
Questions and searches that have been answered in the book above:
6 inch round basement cold air return
Adapting duct work for basements
Basement heating duct location
Basement renovation ductwork install
Basement return duct
Can I move basement duct work?
Diy basement ductwork
Diy hvac basement addition
Ductwork in a basement renovation
Examples of ductwork installation in walls basement
Explain cold air return size basement
Finish basement heating ducts
Finished basement books online
Fix low hanging ductwork
Heating duct relocation / installation in basements
How do you install heat vents to an existing system?
How to add a cold air return in basement?
How to do duct work for basement remodel?
How to fasten furnace ducts to a wall?
How to figure duct work heat basement?
How to install vent in round metal duct?
How to put a heat duct in a already finished basement?
How to replace ductwork located in a basement?
How to run ductwork down walls?
How to run ductwork in a basement?
How to tap into duct in basement?
How to tap into duct in basement?
Install new heat duct in basement
Install new heat duct in basement
Install register duct in shallow ceiling cavity
Installing an additional supply duct
Installing ductwork for finished basement
Installing ductwork in old construction
Installing heat duct through suspended ceiling tile
Measuring and cutting ductwork
Moving ductwork finish basement
Proper placement of a return vent in the basement
Properly install ductwork finishing basement
Recommended heat runs for a basement
Redirecting ductwork in basement
Replace low hanging duct
Replace low hanging duct
Rerunning heating ducts
Return air ducts in finished basement
Tap into ductwork for finished basement
Through the wall fan
|
|
|
A website "ductworkinstallation. com" focus on providing information and services related to the installation of ductwork systems , which are the tubes used to distribute heated or cooled air throughout a building as part of an HVAC system; essentially, it would be a platform for individuals or companies specializing in designing and installing ductwork for homes and commercial properties, offering details on the process, and potential contractors to contact for such services.
Key points about ductwork installation websites:
Services offered:
New ductwork installation, ductwork repair, duct cleaning, duct sealing, airflow balancing.
Target audience:
Homeowners looking to install a new HVAC system, individuals experiencing issues with their existing ductwork, commercial property owners needing ductwork for large buildings.
Information provided:
Explanations on different types of duct materials, design considerations for optimal airflow, potential benefits of proper ductwork installation.
|
Black & Decker The Complete Guide to Ceramic Tile, Third Edition
Book Description
Publication Date: September 1, 2010
Complete DIY tile installation instructions with over 350 how-to, step-by-step photos; tool and material selection guides with full-color photography; design inspiration; the most up-to-date tile products and projects, such as recycled glass tile and other environmentally friendly and sustainable tile, new advancements for tile specifically engineered for outdoors, faux-stone tiles (made of more affordable materials), etc.; tile for all home projects including floors, walls, bathrooms, kitchens, and outdoors. This is the one stop shop for do-it-yourself tile installation instructions. |
Black & Decker The Complete Guide to Bathrooms, Third Edition
Book Description
Publication Date: September 1, 2010
This latest revision of our best-selling bathroom remodeling book features practical, achievable bathroom improvements and upgrades shown with clear color step-by-step photos. This comprehensive book and its hardworking DVD companion cover all the basics of bathroom design and remodeling and includes a gallery of inspirational bathrooms that are sure to provide excitement and ideas. But at the heart of this Black & Decker guide are the well-chosen projects that are featured in full detail. From replacing surfaces and fixtures to installing plumbing and making easy decorative improvements, The Complete Guide to Bathrooms, Third Edition shows you how to save thousands of dollars by doing the job yourself. |
Black & Decker The Complete Guide to Wiring, 5th Edition, with DVD
Book Description
Publication Date: May 1, 2011
The Complete Guide to Wiring has been America's very best-selling consumer wiring book for more than a decade, with previous editions selling more than 1 million copies. This fifth edition has been updated to comply with 2011-2013 Electrical Codes. It also includes an all new Home Automation chapter, as well as major revisions to lighting and ventilation equipment hookups and new material on working with conduit and raceways. |
Black & Decker The Complete Guide to Plumbing Book
Description
Publication Date: July 1, 2008
Everything you need to know about plumbing. Everything.
Fresher and more complete than ever, this edition includes new material and revised information and is completely current with the 2006 Universal Plumbing Code. From basic repairs to advanced renovations, this is the only plumbing reference book a homeowner needs. And now, for the first time, Black & Decker The Complete Guide to Plumbing includes a comprehensive section on working with gas pipe. No other big book of plumbing for DIYers covers this important subject.
Also new to this 4th edition is expansive coverage of PEX (cross-linked polyethylene), the bendable supply tubing that's taking over a major portion of the DIY market. And with the current popularity of outdoor kitchens, we've expanded our coverage of outdoor plumbing as well. Now, we'll show you every step of the process to supply and drain an outdoor sink. |
Black & Decker Codes for Homeowners: Electrical Codes, Mechanical Codes, Plumbing Codes, Building Codes
Book Description
Publication Date: September 1, 2010
Codes are a fact of life for do-it-yourselfers, but getting good information on codes can be a nightmare. Anyone who has ever opened a code book (or even a code interpretation book) looking for the answer to a building, wiring or plumbing question has found the same thing: a lot of arcane, technical words and cross-referencing, pages of meaningless charts, but no information that make sense. Codes for Homeowners combine decades of experience by author and IRC-certified home inspector Bruce Barker with Creative Publishing’s famous studio photography, and the result is the first truly clear and easy to use codes reference book for homeowners and tradesmen alike. Current with 2009 International Residential Code |
Home Theaters and Electronic Houses
Book Description Publication Date: July 1, 2007 Pull up a seat for a colorful tour of sound-proofed, silver-screened retreats fit for movie stars, Starship commanders, and sultans. Take an ultra-privileged tour through some of today's finest high-tech homes, where room-by-room sensors and touch-pad controls put lighting, sound, temperature, and security at your command. Watch screens descend or ascend from unexpected hiding places, projectors appear, and windows disappear in James-Bond-like mechanical transitions. And enjoy flat-screen and plasma entertainments in the most unexpected places: shower stalls, pool rooms, home sports bars, and more. This is the only book that offers an inside look at the ultimate techie fantasies, culminating in today's hottest home trend -- more than 80 dedicated home theaters. Many of these fantasy rooms were drawn straight out of sci-fi, classic films, and even Westerns, embodying the fantasy of Hollywood. Others are to-die-for interiors created by designers in today's hottest styles. Visit basement hideaways that deliver the ultimate theater experience, while doubling as hurricane shelters. There are also bedrooms, playrooms, garages, and even attics that have been remodeled into state-of-the-art theaters and media rooms. Included are equipment lists for many of the projects, and discussions about the art of wiring, and advice on choosing a professional to help you transform your home. This is a lip-smacking look at a luxury that is becoming an increasingly popular domestic investment. Packed with dazzling, mind-blowing pictures of home theater systems and media/rec rooms, the book is sure to inspire and excite movie enthusiasts, architects, and designers looking for insight to the hi-tech world of electronic homes. |
Basement Ideas that Work
Book Description
Publication Date: October 2, 2007 Finding extra living space without adding on might be only a flight of stairs away. Homeowners with a basement have the unique opportunity to turn unused space into a great living space--all without adding on extra square footage to their home. In fact, finishing a basement is one of the fastest and most cost-effective ways to increase living space in a home.
Customer Review
This is very useful if you are finishing your basement yourself. This is not a how-to-manual though. (If you are looking for a how-to I suggest TAunton's Build Like a Pro.) This book is for the planning process. Great photos and ideas on what kinds of rooms you can create with all of that basement space. In addition, each section highlights the major planning considerations for creating that space. From traditional to modern, this book was the best and most current for basement ideas. |
|