|
|
|
From Bureau of Labor Statistics, U.S. Department of Labor, Occupational Outlook Handbook, 2012-13 Edition, Heating, Air Conditioning, and Refrigeration Mechanics and Installers:
Why an HVAC Career?
Heating, ventilation, and air conditioning systems are vital to homes and businesses across the United States. Homeowners and business owners alike need the services of skilled technicians with an HVAC license to do reliable installation, repair, and service for their crucial systems. Companies are looking for qualified technicians who have an HVAC certification to meet the needs of their growing businesses.
The Department of Labor expects HVAC careers to grow at a much faster rate than other occupations. Employers looking to fill these positions are hunting for certified technicians. There is a variety of opportunities available for those pursuing HVAC careers. Various options include employment in wholesale, service, equipment manufacturing, and more. HVAC technician salary levels vary by establishment. Join a career that can reward you and your family!
White House Predicts Robots May Take Over Many Jobs That Pay $20 Per Hour
The White House is worried that robots are coming to take your job.
In a report to Congress this week, White House economists forecast an 83 percent chance that workers earning less than $20 per hour will lose their jobs to robots.
Wage earners who receive up to $40 in hourly pay face a 31 percent chance they'll be replaced by robots, while workers who are paid more than $40 an hour face much lower odds -- about 4 percent -- of losing their jobs to automation.
Industry Outlook:
According to the U.S. Department of Labor, Employment of heating, air conditioning, and refrigeration mechanics and installers is expected to grow 34% from 2010 to 2020. This growth rate is exponentially higher than most other occupations. Commercial and residential building construction will drive employment growth as the construction industry continues to recover from the 2007-09 recession. The growing number of sophisticated climate-control systems is also expected to increase demand for qualified HVAC/R technicians.
Climate-control systems generally need replacement after 10 to 15 years. Numerous recently constructed homes and commercial buildings will need replacement climate-control systems by 2020, spurring demand for technicians.
According to the Bureau of Labor Statistics, job opportunities for HVACR technicians are expected to be excellent, particularly for those who have completed training at an accredited technical school or through a formal apprenticeship.
|
|
Description:
Introducing a cutting-edge approach to mastering the essentials of Ductwork and Furnace Installation! This comprehensive "how-to" guide is packed with hundreds of practical competencies, meticulously designed and modernized to serve as a complete learning system for both novice and seasoned professionals. Dive into the core concepts of ductwork installation with a blend of theory and hands-on applications, covering everything from small residential setups to large-scale installations in houses, apartments, basements, and attics. With enhanced features including an updated tools and materials identification chart, enriched visuals, and revised installation techniques, this edition sets a new standard in HVAC education.
Key Benefits:
- Flexible format allows users to learn at their own pace, either individually or in group settings.
- Step-by-step practical competencies provide hands-on training essential for success in the ductwork installation field.
- Theory lessons can be customized to meet the specific training requirements of local contractors, associations, or individual installers.
Originally authored and published on this site in 2008, this e-textbook underwent significant enhancements in 2015, with added links to the International Code in 2012. Drawing from years of experience as an HVAC contractor for Pulte Homes Company since May 2013, this edition incorporates the best practices gleaned from this collaboration. Hundreds of new photos, showcasing unique installation methods tailored for optimal performance, have been seamlessly integrated into numerous chapters.
For those seeking to excel within their company, chapters updated since May 2013 offer invaluable insights into Pulte Homes' distinctive ductwork installation techniques. Additionally, the full version of the book includes a treasure trove of tips and tricks gleaned from years of hands-on experience.
For prior purchasers or prospective buyers, regular updates are available in the Chapter-by-Chapter Description of Contents pages (2), ensuring access to the latest insights every three months.
"Ductwork Installation Guide" is compatible with both PC and Mac platforms, authored in Microsoft Word, and comprises 63 chapters available for separate purchase. Opt for the Rough-in part for $44.99, featuring 826 photos across 346 pages, or delve into the Basement part for $55.99, offering 1585 photos and 807 pages capturing all installation stages. For the ultimate package, acquire the entire guide for $89.99, encompassing 2411 photos and 1153 pages, along with 46 complimentary Ductwork Installation Tips and Tricks valued at $9.99.
Whether you're a homeowner embarking on a remodeling project, an apprentice seeking to hone your skills, or an HVAC contractor dedicated to equipping your team for success, the Ductwork Installation Guide provides all the resources you need to achieve superior results.
Instant Access:
After you have purchased a paid access page; PayPal is going to bring you back to my website. In order to see the paid page you have to click on the Register button, fill out the form, choose your own Username and Password and click on the Register button at the bottom of the form – congratulation, you are now on the page you have paid for!
Important: After you have purchased any Paid page or Download page and PayPal brought you back to my website, the first thing that you should do is to save that page to your Favorites. Then if something goes wrong you always can come back to re-register yourself on my website again.
This is an online version of the book. No CD version is available at this time.
You can purchase any chapter below and if you purchase the e-book as whole I’ll refund your money back to your PayPal account.
Chapters available online:
|
ROUGH-IN (Chapter-by-Chapter Description of the Contents 1)
1. Introduction, Tools and Equipment
Materials
2. Architectural Features of House
3. House Mark Out
4. Rough-In
5. Heat Runs, Bath Box Installation in Interior Wall
6. Bath Box Installation in Exterior Wall
7. High Wall Heat
8. Bath Box Working for Tow Rooms
9. Oval Stack Installation, Oval Stack in Exterior Wall
10. Bath Box Situated in Parallel to Oval Stack
11. Bath Box Disposed Perpendicular to Oval Stack
12. Bath Box Situated Right above Oval Stack
13. Hooking up Floor Box
14. Oval Stack Situated in Interior Wall
15. Oval Stack in Wall between Two Joists
16. Oval Stack in Wall Perpendicular to Joists
17. Hooking up Oval Stack to Toe Kick 90*
18. Uncommon Cases of Oval Stack Installations
19. Cold Air Return Installation
20. Cold Air Frames Installation
21. Blockers Installation
22. Uncommon Cases in Installation of Air Returns
23. Bath Fan Exhausts
24. Bath Fans Installation
25. Uncommon Cases of Bath Fan Exhausts
26. Dryer Vent
27. Kitchen Exhaust
28. Fresh Air Cap Installation
29. Venting of Furnace
30. Thermostat Wiring
31. Firestop Insulation
32. Temporary Furnace Suspension
|
BASEMENT (Chapter-by-Chapter Description of the Contents 2)
33. Basement, Preparation of Workplace
34. Sheeting (Panning)
35. Variants Sheeting Installation from Cold Air Return
36. Double Sheeting
37. Furnace Installation
38. Plenum Installation
39. Ductwork Installation
40. Cold Air Return Duct Installation
41. Supply Duct Installation
42. Calculation and Manufacturing Off-set and Riser
43. Heat Runs Installation
44. Jumper Installation
45. Application of 8” Pipes and Fittings
46. Basement Heats
47. Fresh Air, Combustion Air
48. Microwave Hood, Jenn-air, Kitchen Hood
49. Venting
50. Condensate Line, Venting and Condensate
Line for Comfortmaker and Aire-Flo furnaces
51. Humidifier Installation
52. Registers and Grills Installation
53. Thermostat Installation
54. Finishing Basement
55. Installation of Heating System in Big Houses
56. Air Handler Installation
57. Underground Ductwork
58. Garage Heaters
59. Furnace Change-out
60. Correcting Mistakes
61. Safety Techniques
62. Duct Sealing (New)
63. Uncommon Cases, Conclusion
|
Ductwork Installation Tips and Tricks (47) - added to the full version of the Ductwork Installation Guide book.
The Latest Update: 03/30/2020
HVAC Quality Installation Specification
Charles Ashton bought this e-book in 2011, came back in 2013 and now wrote this email to me:
Ed,
I have been in the HVAC Service Field for many years and I am now branching out more into the installation of duct work. The Ductwork Installation guide had step by step instructions, and is very well written and informative for the layman to understand. I use to have problems doing offsets and this book explains it, in its simplest form. I did substantial research on finding a Ductwork guide that would give much detailed information as possible, and your book was the most informative one I could find with the opportunity to get updates in the future. I am very glad that I purchased this and I look forward to viewing your website for more project information as needed.
Best Wishes,
Charles Ashton, Owings Mills, Maryland
04/10/2016
This is the place where the people who have purchased one of my books can say Thank You. Join the others and show your accomplishments in the ductwork installation field!
|
|
|
DUCTWORK INSTALLATION GUIDE $89.99
|

|
New!
If you don't need all 63 chapters of the Ductwork Installation Guide e-book or maybe you need more this is fine! Pick the chapters you need, add more paid pages from the other parts of this website at discount price, create your own e-book on this page and save!
|
|
Totally Hand Made Duct Fittings
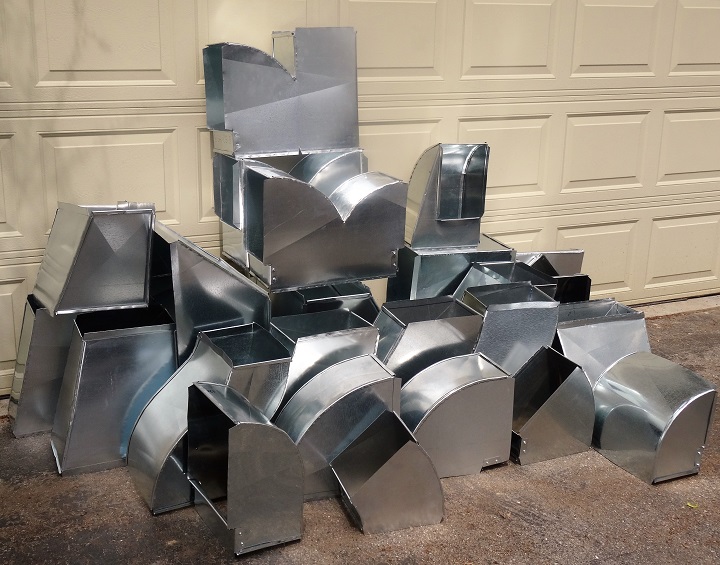 Not too long ago I, like many of you, sincerely thought that the way of making any kinds of sheet metal fittings is only possible by using sheet metal brake and metal forming machines! Not anymore: Not too long ago I, like many of you, sincerely thought that the way of making any kinds of sheet metal fittings is only possible by using sheet metal brake and metal forming machines! Not anymore:
From late Fall and Winter of 2015 through May 2016 I made more than twenty most frequently-used sheet metal fittings without using any of these very expensive machines.
All the fitting that you see in the picture on the left I made with hand-tools only!
The price of all 35 tutorials below, if you would buy them separately is $90.00, however if you would like to purchase an instant access to all of them at the same time you can do it for a low price of only $29.99!
List of Tutorials:
- How to Make Cone Reducer
- How to Make Square to Round Offset Transition
- How to Make Round to Square Transition
- How to Make 45* Roof Penetration
- How to Make Radius Elbow
- How to Make 45* Radius Elbow
- How to Make Radius Offset
- Now to Make Radius Riser
- How to Make Offset and Riser in One Piece
- How to Make 90* Square Throat Elbow
- How to Make 45* Square Throat Elbow
- How to Make Vertical Elbow
- How to Make Square to Rectangular Vertical Elbow
- How to Make Square Throat Offset
- How to Make Square Throat Riser
- How to Make Square Throat Tee
- How to Make Transition Tee
- How to Make Y- Branch Fitting
- How to Make Riser Starting Transition
- How to Make Flat on Top & Side Starting Transition
- How to Make Centralized Hess Fitting
- How to Make Flat on One Side Hess Fitting
- How to Make 45* Hess Fitting
- How to Make Flat Duct Reducer
- How to Make Vertical Duct Reducer
- How to Make Flat & Vertical Duct Reducer
- How to Make Transition from Your New Furnace to Old Plenum
- How to Make 20 x 20 to 30 x 25, One Inch Offset Transition
- How to Make 24 x 10 to 10 x 24 Duct Transition
- How to Make Transition from Duct
- How to Make Flat Offset Transition from Duct
- How to Make Transition from Whole Duct
|
|
|
A website "ductworkinstallation. com" focus on providing information and services related to the installation of ductwork systems , which are the tubes used to distribute heated or cooled air throughout a building as part of an HVAC system; essentially, it would be a platform for individuals or companies specializing in designing and installing ductwork for homes and commercial properties, offering details on the process, and potential contractors to contact for such services.
Key points about ductwork installation websites:
Services offered:
New ductwork installation, ductwork repair, duct cleaning, duct sealing, airflow balancing.
Target audience:
Homeowners looking to install a new HVAC system, individuals experiencing issues with their existing ductwork, commercial property owners needing ductwork for large buildings.
Information provided:
Explanations on different types of duct materials, design considerations for optimal airflow, potential benefits of proper ductwork installation.
|
|