|
|
|
Combustion Air Intake Installation
This chapter from the Energy Saving Edition book gives a detailed description of the Combustion Air Intake installation, which according to code must be an important element of your HVAC ductwork system. In the chapter you can find pictures of all necessary tools, materials and pictures of the Combustion Air Intake installation. There are 31 pictures. Installation is divided into six steps, which represent the entire project in the making.
This is a parent page. If you would like to read more you can buy an instant access to the secondary page for the price of only $2.50.You can pay right here on this page by using the "Buy Now" button below.
Instant Access:
After you have purchased a paid page, PayPal is going to bring you back to my website. In order to see the paid page you have to click on the “Register” button, fill out the form, choose your own Username and Password and click on the “Register” button at the bottom of the form – congratulation, you are now on the page you have paid for!
Important: After you have purchased any Paid page or Download page and PayPal brought you back to my website, the first thing that you should do is to save that page to your Favorites. Then if something goes wrong you always can come back to reregister yourself on my website again.
|
|
Combustion Air Intake Installation in Pictures
 For years, I was preaching about high necessity of the combustion air intake, but did not have one installed in my own house. I have both - high efficiency furnace and a water heater and a water heater was working just fine, recently I've discovered why! My builder left narrow, but long gap in the overhangs under the bay window and fireplace shaft, and this was my combustion air intake! For years, I was preaching about high necessity of the combustion air intake, but did not have one installed in my own house. I have both - high efficiency furnace and a water heater and a water heater was working just fine, recently I've discovered why! My builder left narrow, but long gap in the overhangs under the bay window and fireplace shaft, and this was my combustion air intake!
Therefore, I've decided to install one, figured out its size, bought materials, took some pictures and posted them on this page.
Also, in order to make this page more informative I included several pictures from another finished basement project. They are just like the pictures taken from my home installation show step-by-step sequence of installation.
In order to gain an access to the Combustion Air Intake Installation in Pictures page you have to pay an access fee of $2.00. Just click on the “Buy Now” button below. Once you pay, you will gain an instant access to the page!
Pictures from "How to Stop Cold Air from Fresh Air (Combustion Air) Vent in Furnace Room" paid page (see below) included.
Instant Access:
After you have purchased a paid page; PayPal is going to bring you back to my website. In order to see the paid page you have to click on the “Register” button, fill out the form, choose your own Username and Password and click on the “Register” button at the bottom of the form – congratulation, you are now on the page you have paid for!
Important: After you have purchased any Paid page or Download page and PayPal brought you back to my website, the first thing that you should do is to save that page to your Favorites. Then if something goes wrong you always can come back to re-register yourself on my website again.
|
|
How to Stop Cold Air from Fresh Air (Combustion Air) Vent in Furnace Room
Question
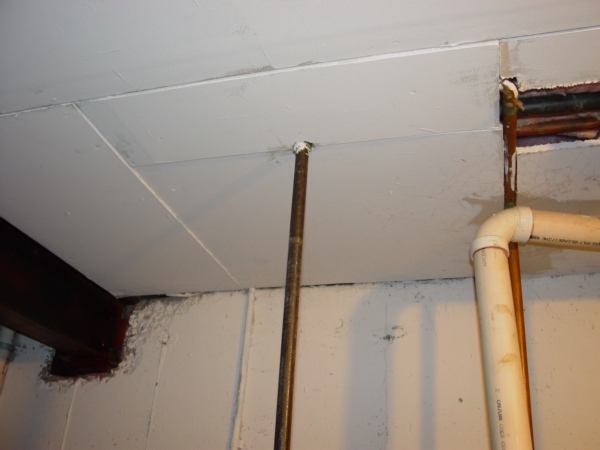
My family and I live in MN. Every winter I have dealt with issues of cold air coming from all areas of our 1955 home with a 3-year-old addition with in-floor heat. I finally installed a fresh intake vent that has halted any cold air coming from other areas of the old part of the house.
With all of our gas appliances and vent fans I calculated an 8 inch size vent. The problem is all that cold air is really pouring out of there and I bought a plastic tub that sits right behind the new boiler but the floor in the laundry room is so cold and it spills out into the rest of the basement.
I temporarily placed salt bags for our softener into the opening of the doorway of the utility room to prevent it from coming into the rest of the basement with little success. I didn't think it would get that cold. I even used the R-10 insulated flex tubing for ducting the fresh air, which works great except for the air not staying in the tub.
Before I put this venting in and we had our old boiler, which was 30 some years old, our CO2 alarm went off 2 times in 10 years but I didn't think it was such a big concern with the cold air pouring into the older portion of our house from everywhere. I finally decided to get a new boiler and the fresh air intake.
Is there anything I can do to keep this cold air at bay?
Answer 1
I teach property-rehabbing classes in the St. Paul Community Education Program...so I encounter questions like this all of the time. In my own house, I made my insulated flex duct (fresh air intake) purposely EXTRA long, and formed a very large P-trap out of the flexible tubing (to mimic that of a plumbing P-trap). The thought behind this is that cold air likes to drops (where warm air rises). By forming this very large P-trap with the flexible duct, I am forcing the cold intake air to travel 3 feet UPHILL again before dropping down into an empty 5-gallon bucket.
Also, something else to consider. Once shaping your intake into a large P-Trap like this, if cold air is still pouring in, then you have a large amount of warm air escaping somewhere else in the house (i.e. up a fireplace chimney or similar). Cold air will only pour in like that (after forming the P-Trap) IF warm air is being exhausted rapidly somewhere else in the house.
Hope this helps and good luck!
Answer 2
Our home in Edmonton, AB Canada was built in 2003/2004 and has a near identical setup to yours - two 6" fresh air intakes, one to the cold air return portion and another to a combustion pot that runs to the floor and simply dumps fresh air into the basement. We also have a mid-efficiency furnace (sounds like you do as well) and a natural gas hot water tank with both "chimneys" tied together.
After developing my basement, I've come up with three solutions to our problem:
1) Install a motorized damper designed by Hoyme - Hoyme Manufacturing Inc - Motorized Dampers & Ventilators - North America. This closes the fresh air intake combustion pot and when the furnace comes on it opens up. Depending on who you speak to you may also want it to open up for when your hot water tank runs (I would to be on the safe side to eliminate CO poisoning risks). You can install a heat sensor on the tank that will open the damper up. You can even go as far as installing a second damper for the fresh air intake that goes into the return air ductwork as freezing cold air is not good for your furnace. Downside - cost of the dampers and availability in your area.
2) Relocate your fresh air intake combustion pot near the furnace. Frame and close off the furnace room. Assuming your combustion air requirements are sufficient, install weather proofing/stripping around the furnace room door to contain the cold air within the furnace room.
3) Ditch the mid-efficiency furnace and go with a high-efficiency furnace. This eliminates the need for the 6" fresh air intakes and will require the installation of PVC pipes to the outside of your house for intake/exhaust.
All three of these options are valid in my location but I would suggest consulting with your local authorities and building codes before making your decision.
I haven't decided on what route to take myself. With the basement being finished it's not too cold except I built an office attached to the furnace room so my feet get cold. I've got a blanket tucked underneath the furnace room door to keep the cold air in. For the first couple of years living here I remember very well how cold the basement can get.
I put a lot of thought and research into this so I hope this helps you, good luck!
For years, I've heard about these issues related to the combustion air intakes, but never faced it myself before. However, recently I install one in my house and now I joined a legion of people who trying to resolve this inconvenience once and for all!
At first as many of you, I've searched the web and all the solutions that I found there were just laughable:
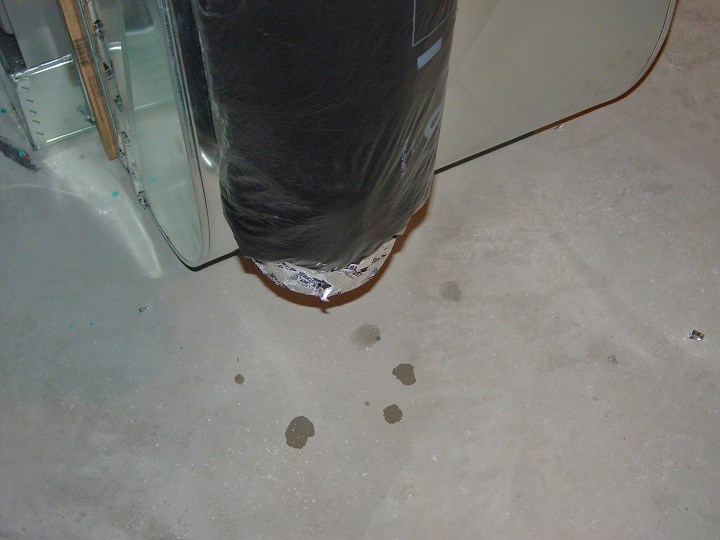
1. Drop the pipe down into an empty 5-gallon bucket.
It doesn't work. You can try it at home just as I did - the result is obvious!
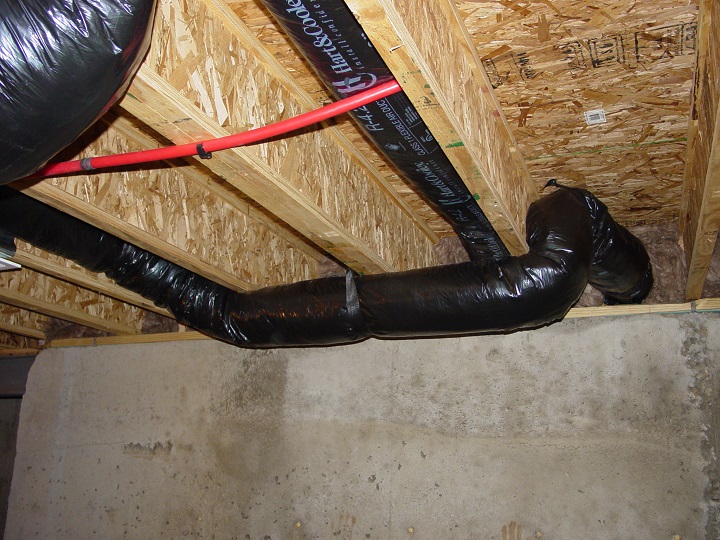 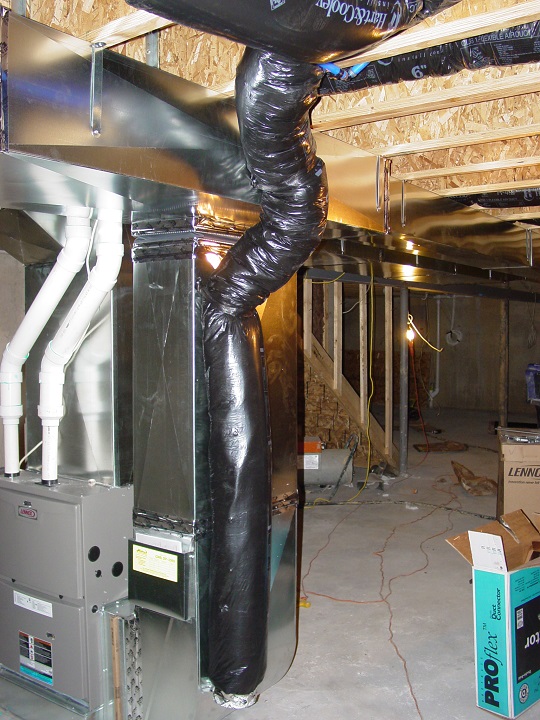
 2. Forming very large P-trap with the flexible duct, I am forcing the cold intake air to travel 3 feet uphill again before dropping down into an empty 5-gallon bucket. 2. Forming very large P-trap with the flexible duct, I am forcing the cold intake air to travel 3 feet uphill again before dropping down into an empty 5-gallon bucket.
I even don't want to give it a try, this idea, even if it works is just plain stupid. Just think about it: who in his straight state of mind would buy a box of flex and make a goofy P-trap out of it and after that is all done on top of it, again, drop it in a bucket?
As you can see it in the pictures above this kind of installation was actually done in one of the new houses I'm working on daily. Of course this trap isn't as big as it was suggested above, but it didn't slow down the outside air even a bit...
3. Install a motorized damper designed by Hoyme.
Well, this is not a really bad idea, but it doesn't work. It doesn't work because you can hook up this damper to the furnace only, and as it said above: "You can install a heat sensor on the tank that will open the damper up".
Look, the average price for the damper is $225.95, plus shipping and handling. Plus installation, and plus a heat sensor with installation - just too expensive!
4. Relocate your fresh air intake combustion pot near the furnace.
Just read above it doesn't work.
5. Ditch the mid-efficiency furnace and go with a high-efficiency furnace.
This one is just plain stupid, I do not want to even discuss it here!
So, I've looked at all this solutions and come up with my own one. Bought materials, installed it and let it work for awhile. It is working.
Now it is time to share this simple and very inexpensive solution (I spent less than $10 on my 4" combustion air intake) with visitors of my site.
On the paid page, you will see pictures of tools and materials and three pictures of installation with step-by-step explanations.
The price for an instant access to the page is only $1.44.
Instant Access:
After you have purchased a paid page; PayPal is going to bring you back to my website. In order to see the paid page you have to click on the “Register” button, fill out the form, choose your own Username and Password and click on the “Register” button at the bottom of the form – congratulation, you are now on the page you have paid for!
Important: After you have purchased any Paid page or Download page and PayPal brought you back to my website, the first thing that you should do is to save that page to your Favorites. Then if something goes wrong you always can come back to re-register yourself on my website again.
|
|
Questions and searches that have been answered on the paid pages above:
Add combustion air
Adding vent for combustion air
Air intake from attic stop drafts
Air intake insulated flex tubing bucket
Air trap designs for furnace burner intake
Beckett burner combustion air intake boot kit
Boiler room combustion air too cold
Bucket for cold air in furnace room
Build a combustion air pot
Can you block off air intake to hot water heater
Chicago combustion air boilers PVC intake
Combined outdoor air hood and furnace intake
Combustible air for hot water tank from attic health risk
Combustion air bucket
Combustion air bucket price
Combustion air cold air trap
Combustion air duct sizing
Combustion air ducting
Combustion air for furnace
Combustion air inlet
Combustion air intake covers
Combustion air intake fittings
Combustion air intake for furnace install how to
Combustion air intake gooseneck
Combustion air intake hood for oil furnace
Combustion air intake vents
Combustion air pot
Combustion air requirements illustrations
Combustion air sheet metal heat trap
Combustion air vent for garage pics
Combustion pot
Comfortmaker furnace combustion air intake pictures
Condensation drop for air intake for furnace
Does the combustion air intake pipe have to be located outside the home?
Dryer combustion air through bucket system
Energy savings how to decrease cold air from furnace intake
External combustible air intake necessity and furnace
Fresh air combustion pot
Fresh air combustion pot freezing my basement
Fresh air intake keeps cold air out
Furnace combustion air pot design
Furnace combustion air requirements
Furnace room chimney combustion intake
Gas furnace combustion air intake vent
Gas hot water heater installation combustion air outsider
How do I bring additional combustion air into basement?
How do I stop cold air coming into the intake ducts of my furnace?
How much air needed for combustion?
How much combustion air is needed for a furnace?
How to add more combustion air into enclosed furnace room?
How to bring fresh air in to a furnace room diagram
How to calculate combustion air supply?
How to install a furnace combustion air duct?
How to install a outside combustible air intake?
How to prevent cold air dropping in house from return air plenum?
How to size combustion air?
Is a 6 " combustion air intake pot mandatory building code
Mid-efficiency furnace combustion air duct making the basement cold
Outside combustion air intake installation
Payne furnace combustion air intake pipe cap
Propane furnace combustion air intake
Should the combustible air intake on high efficiency furnace be going outside or not?
Stopping air from pouring in from fresh air intake
Too much wind into gas heater fresh air intake
Trane furnace combustion intake install
What is combustion air intake?
What size duct is needed for combustion air for a furnace and water heater?
What to do about cold combustion air? |
|
|
A website "ductworkinstallation. com" focus on providing information and services related to the installation of ductwork systems , which are the tubes used to distribute heated or cooled air throughout a building as part of an HVAC system; essentially, it would be a platform for individuals or companies specializing in designing and installing ductwork for homes and commercial properties, offering details on the process, and potential contractors to contact for such services.
Key points about ductwork installation websites:
Services offered:
New ductwork installation, ductwork repair, duct cleaning, duct sealing, airflow balancing.
Target audience:
Homeowners looking to install a new HVAC system, individuals experiencing issues with their existing ductwork, commercial property owners needing ductwork for large buildings.
Information provided:
Explanations on different types of duct materials, design considerations for optimal airflow, potential benefits of proper ductwork installation.
|
|