|
Plastic Ductwork Systems
Below ground ductwork system of pipe and fittings for slab foundation applications
Plastic ductwork systems are well suited for underground applications because they are resistant to rust and other forms of corrosion. These systems are manufactured with either high-density polyethylene (HDPE) or polyvinyl chloride (PVC). When installed properly, they are watertight and airtight and can withstand temperatures up to 150oF.
Plastic ductwork is available in diameters of 4 to 24 inches, with a variety of fittings including tees, wyes, elbows, 45-degree elbows, register boxes, saddle boots, saddle connections, reducers, couplings, end caps, and starting collars. Plastic plenum boxes are also available for underground installation.
While it is preferable to install ductwork in conditioned space to maximize energy efficiency, it is not always possible. In some places in the country, placing ducts underground may be the next best strategy, particularly if the slab edge is insulated. In hot climates, for example, it is more energy efficient for the cooling ducts to be under the slab than exposed in a hot attic. In areas where ground moisture and water intrusion may be an issue, however, extra care must be taken when installing the underground ductwork to protect it from excess water.
HDPE
These underground air ducts and fitting systems were first introduced into the market in 2003 for use with forced-air heating and cooling systems. The ducts consist of a high-density polyethylene (HDPE) liner covered with a layer of air-entrained polyethylene. These HDPE pipes have a K-value equal to PVC wrapped with R5. The ducts and fittings are typically blue in color.
PVC
Conventional PVC plastic pipe can also be used in below-ground duct applications. The pipe and fittings are typically white, black, or gray in color. Sunlight contains ultraviolet rays, which degrade PVC, so care must be taken during construction to protect the PVC from exposure to the elements. The ductwork is the same material as PVC plastic pipe used in below-ground plumbing systems, which have been installed successfully in the United States since the 1950s.
Installation
The plastic ductwork and fittings are designed to install with ease. HDPE cuts without chipping or cracking. The ductwork uses dimensionally matched fittings and has a convenient strapping fixture. The HDPE pipe and fittings are manufactured with male ends and are joined with a gasket and clamp assembly.
The plastic ducts are installed directly on the bottom of a compacted trench excavated to the desired level. The trench should slope to allow drainage to a point provided with access. Two sections of pipe (or pipe and fitting) are placed end to end. The adhesive backing is peeled off from a gasket and the gasket is wrapped around the pipe. Before the gasket is overlapped (approximately one inch), a bead of caulking is run along the leading edge. A clamp is placed around the gasketed joint with the clamp and gasket lined up. To keep the clamp from falling off, the unknotted end of the clamp is slid under the guides and over the first notch. The clamp handle is closed to finish tightening the joint.
Embedded air duct pipe shall not be considered a structural replacement for the displaced concrete in the slab design. The loading of the pipe from wet concrete and/or soil above the pipe shall be limited so as not to produce deflections greater than 15 percent of the original pipe diameter.
Benefits/Costs
Plastic ductwork systems are durable, non-corrosive, water- and air-tight ductwork and fittings that can be installed subsurface in slab-on-grade applications. They are easy to install, and don’t require any special tools or equipment. However, underground plastic ductwork systems should only be used in new construction in sub-slab applications, as they can not be installed above ground, or where there will be any exposure to sunlight. While plastic ductwork systems are energy efficient, energy savings are maximized only when used in cooling climates, when it is not feasible to install the ductwork in conditioned space.
Photovoltaic - Building-Integrated Photovoltaic (BIPV)
Photovoltaic modules that are integrated directly into a roof's surface to provide more aesthetic appeal
Many homeowners recognize the value of solar energy technologies but have been leery of the highly visible collectors on their roofs. Although the term "solar power" may be synonymous with environmental-friendliness and freedom from fossil fuel dependence, some types of solar systems have been avoided because of their unattractive (or unique) appearance from the curb. For this reason, photovoltaic (PV) modules,, which convert sunlight directly into electricity, have been integrated into roofing or other building materials as an alternative to traditional PV modules that are mounted above the roof on racks. The result is a photovoltaic system that is less noticeable but has benefits that are hard to miss. Once installed, BIPV components not only protect the home from storms and rainy weather but produce free electricity for use in the home. The residential industry most often uses building-integrated photovoltaic roofing products; however PV systems can also be integrated into façade materials, awnings, and covered walkways.
The many types of photovoltaic roofing products compliment many different roofing materials including asphalt shingles, standing seam metal roofing, and slate or concrete tiles. BIPV roofing products are produced by manufacturers whose products are designed to serve both functions -- as a roofing material to protect the home and as an electrical device to produce electricity. PV systems can be sized on a small scale to produce a limited amount of energy or be large enough to power an entire home and send excess electricity to the utility.
Most residential BIPV systems are used in conjunction with utility-supplied power. In addition to the PV-active roofing, an inverter, located near the electrical panel, converts the PV produced electricity into utility compatible alternating current (AC) electricity for the home. PV systems that utilize battery storage can produce electricity for the home even when the utility power is disconnected or when the sun is not shining. Utility-provided electricity is used when the house demand is greater than can be supplied by the photovoltaic roofing. .PV systems can be sized on a small scale to produce a limited amount of energy or be large enough to power an entire home and send excess power produced during daylight hours back into the utility's lines. Typical residential PV systems commonly have a peak power production of between 1,200 and 5,000 watts, AC - requiring 150 to over 1000 square feet of roof area depending on the efficiency of the PV technology used.
Installation
PV roofing systems are supplied by distributors ready to install. PV roofing installations require a portion of the roof to be exposed to direct sunlight. In North America, for example, the southern roof must be unshaded. Depending on the BIPV product, systems can be installed by a trade contractor professional, an electrician, or both. BIPV must be wired to the house power supply by an electrician.
Benefits/Costs
PV roofing products provide environmental benefits because they do not produce pollution or carbon dioxide emissions like fossil fuel-based utility power. They are also more attractive than many other solar systems, which increases consumer acceptance.
|
|
|
Extending HVAC ductwork
When people are planning to change their layout of ductwork, finish a basement off, kitchen remodeling or other renovations they are usually buying my books or paid pages, because there is no other place to go. However, not all of them! Some of them are looking for help on the Forum websites. Below you can see one more example of it. (More examples are here).
Aharami
Extending HVAC ductwork. Hard to DIY?
Hi. New to this forum here. I'm a big fan of DIYing. I don't know everything, but like to learn stuff and do it on my own. Previously, I have replaced windows, renovated my kitchen, put in new recessed lights, done tile work, etc, all by researching beforehand as well as learning as I went along. But I've never done any HVAC work before. So here goes.
My main furnace/blower is up in the attic and has a hard time warming up the 1st floor adequately during the winters. Well my basement has a separate furnace/AC for the basement alone. I recently replaced this furnace with a new high efficiency one since the old one was dying. I'd like to cut out some 4"x10" floor registers on the 1st floor and extend the basement ductwork to share some of the heating between basement and 1st floor. That way, 1st floor will be heated mainly by main furnace up in attic, but also by basement furnace when it kicks on.
First of all, this is the layout of my basement. As you can see, current duct runs along right wall, almost the length of the basement.
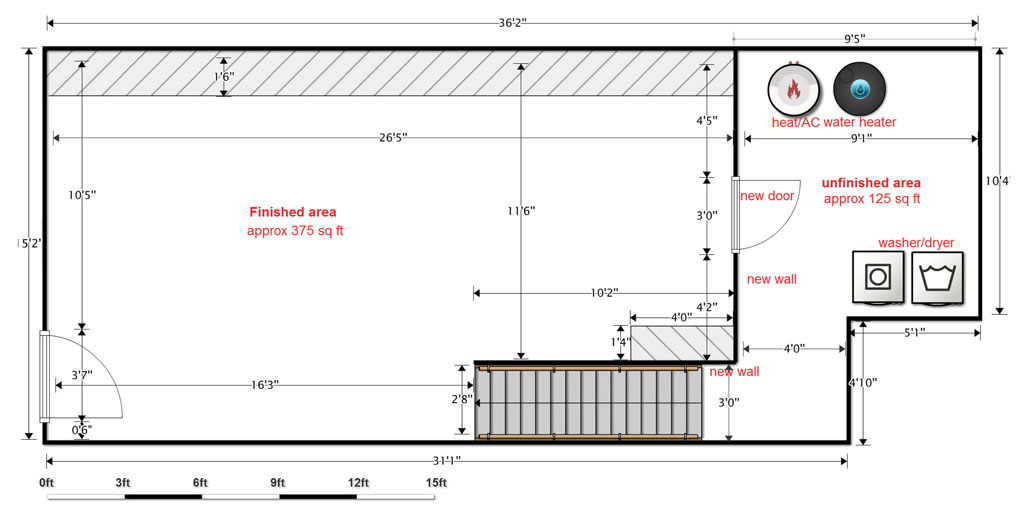
I would like to take part of the duct down, and cut two holes on top to create feeds for the new 1st floor registers.
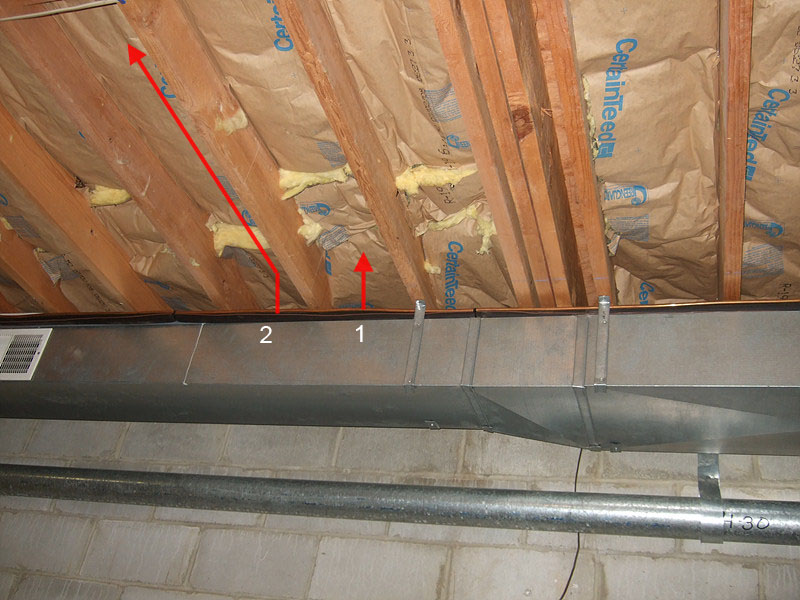
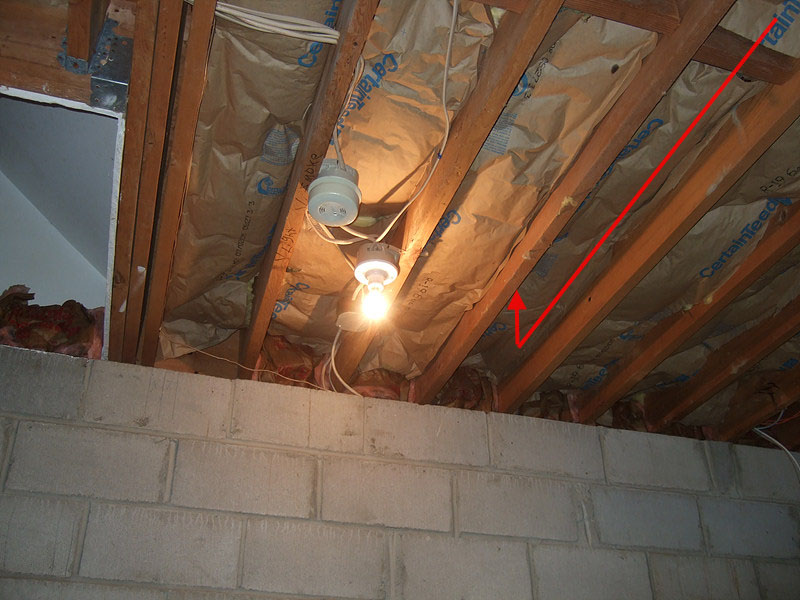
(1) Register will sit right on top of where duct lies. So that new duct will just go straight up between the ceiling joists and thru the ceiling/floor.
(2) Register will sit on the other side. So for this one, I'd like to up from the current duct into the ceiling cavity, make a 90° turn and go across between the ceiling joists so that I can have a flat ceiling when I finish off the basement.
 
This is my plan anyways. But since I've never done this before, I'd like to know if there's something I'm not thinking of, or not aware of. How big of a duct will I need for the cross run? Will a 7" round suffice? The cross run will be about 13-14'. What other materials will I need? What should I know when performing this. Any info helps. Thanks
Well as you can see, Aharami has a lot of questions, which could be easily answered on my website!
beenthere
What about return air?
If you run supplies from that furnace to your first floor. You need to also run a return. Or else you won't get much air to the first floor. And you will put your basement into a negative pressure. And could draw CO from your water heater and furnace. And harm you and your family.
Keep in mind. That the cold air from the first floor will fall through the new duct work and cool your basement off quicker after you do this.
Beenthere is offered his very usual answer, which is useful only in general terms, but did Aharami get what he expected? You decide!
aharami
Will adding two more openings really over work it though? It's a 45k BHUh Ruud 2 stage furnace that has 890 CFM at low setting, and 1140 CFM at high. Right now the basement duct has 3 registers, and the basement is 500 sq ft. after finished off, the heated area will be ~400 sq ft.
The return air will remain where it is. I will create a partition wall where the return box begins with a big opening for the return register, and the furnace will be getting it's return air from the finished part of the basement.
Thermostat and return for basement furnace will remain in basement. Thermostat for main furnace is on 1st floor (I wont be putting the new registers anywhere near the main thermostat). The basement furnace will kick on when it wants to, and throw some added air into the first floor as a bonus.
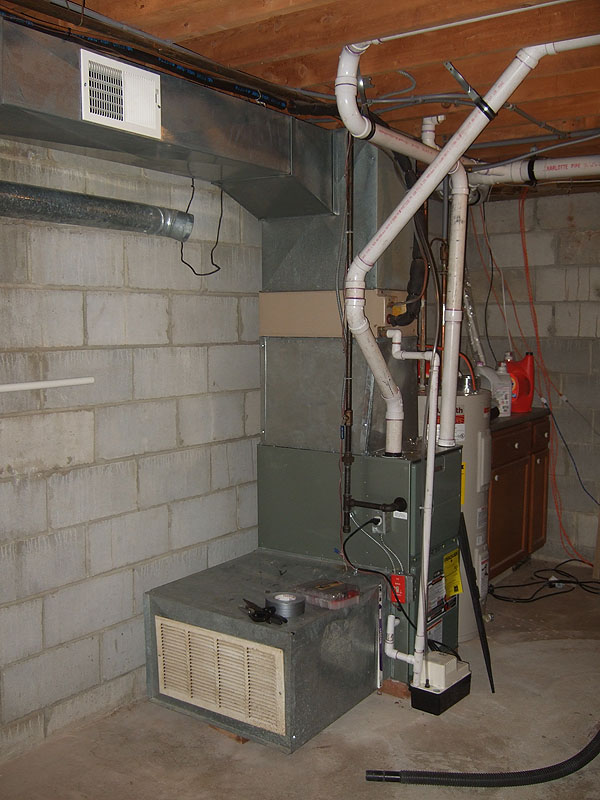
Before we go any further, look at this installation! The hacks were doing that! There are so many mistakes I do not even know where to start! This installation should be posted on my "Wall of Shame" page!
beenthere
Since its hard to get a furnace any smaller then 40,000 BTUs. I understand why you have such an oversized furnace for your basement.
If you don't have a large undercut on your basement door. You'll put the basement into a negative pressure. And it will draw air from everywhere it can. Including from the water heater's chimney if you have a gas fired water heater (can't tell from the pic).
Cold air will fall from the first floor through the supplies, and cause the furnace to cycle more often. And may cause some over heating problems in the areas that you install the supplies in when it does run.
Again, there is very useful information, but what about some help for Aharami?
By the way, this installation is so bad that I would recommend him to purchase my Ductwork Installation Guide's Basement part.
tinmanrob
Someone please correct me if I am wrong, but that looks to me like a horizontal evaporator coil laying on its side.
Tinmanrob probably meant "vertical".
beenthere
Might be a half case coil.
So far I do not see any additional posts in this thread. May be I'm wrong, but its looks like that Aharami gave up, and is looking for help some place else, maybe he is even looking for my website? Who knows...?
Okay, so I have some bad news - this thread is officially dead! Aharami has never come back to that Forum website, probably because he realized that it's useless.
However, he was very committed in his pursuit to find some necessary information online, so that is why he opened a couple more threads on some other DIY websites! On one professional website no one even bothered to respond, but on another he eventually got what he wanted, but... But, I would not suggest him to follow these recommendations, it is why I am not publishing them here on this page.
That particular Forum website is not a professional one. There is just a crowd of DIY-ers helping each other by offering free advice on everything they know or heard from somebody else. Some of them have some rudimentary knowledge, and they are itching to spread it out.
However, Aharami is thinking that he got some good advice and I won't tell him otherwise... Let's keep him happy!
So, why did all these pros simply ignore that thread? Here is a very simple explanation:
Would you give me a step-by-step instruction on how to do your job free of charge? I do not think so!
Did I say that another DIY Forum website didn't even bother to respond, didn't I? I was wrong! They just woke up:
Zippyman
Well, I can't say I recommend what you're doing, but just a little advice & some HVAC factoids anyway...
Your basement furnace won't push (much) air into the upstairs unless you allow it to suck some out (of the upstairs). Air is like spaghetti, you can pull it all you want, but pushing doesn't work very well.
Air returns are NEVER in "wet" rooms - don't pull air from kitchens or bathrooms.
Air returns can be "panned" across joist-work, and hollowed out of wall space, but WIRING IS NOT ALLOWED in air return space.
6" is the "standard" duct size for one register.
At a minimum, remove the paper from the insulation under your floor joists in any area of the basement that is heated- a minor temp. differential between floors will cause condensation & mold if there is a vapor barrier (paper) present.
If this finished area is only going to be used infrequently, and left "cold" most of the time - your plan will likely result in a very un-comfortable upstairs whenever you do fire it up. It could take a long time to warm up the basement, and in the mean time, you're dumping BTU's upstairs, which likely doesn't need them.
At a minimum, install "dampers" in the ductwork leading upstairs so you can minimize airflow if you need to. They won't be expensive, they're just a round/flat plate with a small lever you can close to block off an un-needed duct.
OK, is this a good post? Yes it is a good one. Could you consider this post helpful? I do not think so! Why?
Where is a list of tools and materials? Where are the step-by-step instructions? I do not see them here.
|
However, someone could ask me a question and because this page existed only for a few days someone definitely will - how would you be able to help Aharami? Well, it would be a very easy question! Let's take a closer look at all of his questions and beyond.
First of all, I would tell him that his main ductwork is undersized and on the low setting probably the temperature raise is too high, but on the high setting it's too noisy.
His cold air plenum should be redone because:
- Its stays away from his finished area and he has to learn how to hook it up to the wall
- His idea of using this furnace without running a cold air return from the first floor may not work as good as he wants - mainly in the summer time and because of that he should keep a door to his finished part always open
His furnace installation looks terrible and I would suggest:
- Redo the venting and condensate line
- Condensate line is done with code violations and his condensate pump sits right in front of the furnace
After he finishes his basement off there won't be enough combustion air for the furnace and dryer and according to code he must have a fresh air intake:
- Install fresh air intake only, plus put a register on the supply plenum for unfinished (mechanical/laundry room area)
- Install both, plus a register
Run thermostat wire to the first floor because if he will put it in the finished basement his system won't be working properly:
- In the winter time once its heated the finished part of it will stay warm much longer than the upstairs
- In the summertime it won't help him to cool the first floor because in the basement it is always much cooler naturally
In order to follow all these recommendations he should buy my "Ductwork Installation Guide's" "Basement" part only for $49.99.
However, what if Aharami decide stick to his plan and disregard all my and Beenthere's recommendations? This is fine too. Let's take a look at his questions:
He'd like to cut out some 4"x10" floor registers on the 1st floor - I have "Save Energy by Closing Supply Registers" chapter in my "Energy Saving Edition" book dedicated to this issue and it's only $2.50.
He would like to take part of the duct down, and cut two holes on top to create feeds for the new 1st floor registers - I have "Duct Span Removal" ($2.50) chapter from my "Finished Basement Edition" for the first part and chapter "41. Supply Ductwork Installation" ($1.86) for the second.
How big of a duct will I need for the cross run? - 6" is enough.
Will a 7" round suffice? - Well, he may use this one too if he wants to direct more air to upstairs.
What other materials will I need? - He can buy Chapter "1. Materials" ($1.86) from my "Ductwork Installation Guide" to see all of them plus pictures of all necessary tools and I would let him know what exactly he may use.
In addition, of course, he may need to purchase chapters "Installation of Combustion Air Intake" and "Installation of Fresh Air Intake" from the "Finished Basement Edition" for $2.50 each.
This way he could spend $10.14 total and get all his questions answered! Is it worth the price? Please let me know if you have any questions or concerns on this page and I will publish your comments below.
To sum up:
- Can you find help online? Yes, you can! DIY-ers all over the world are ready to help you out!
- Can you find professional help online? No you cannot, unless of course you will buy one of my books or paid pages.
In addition, here is one more example taken from another pro site, (but they totally banned DIY!):
jpsmith1cm
So, I managed to hack together a functional central AC system for the wife this year. yeah, yeah, I know, no DIY.... Spare me.
Been noticing lately that sometimes the ductwork gives a little bang or booming sound when the unit shuts down. Not too bad, but sometimes it wakes the dog up who then wakes everyone up. Not a good thing at 1AM.
How do I go about tracing out an issue like this?
GREGHVACGUY
If your duct work bangs then its not right. If you think we will help you are in the wrong place for that.
bmathews
3 options:
1-shoot the dog
2-don't run the a/c
3-get rid of the wife
I personally vote for #3
and so on, but I have a Paid Page dedicated to this issue!
Ed, 06/19/2010
|
|
|